

Body toning is about more than just shedding fat it’s about sculpting your muscles, improving posture, and creating a balanced, strong physique. Different exercises shape your body in unique ways, but yoga offers a distinct approach that combines strength, flexibility, and mindfulness.
Can yoga tone your body?
Yes, yoga can tone your body in a way that feels organic, graceful, and functional. Without relying on weights or machines, yoga focuses on how you move, stretch, and hold your poses. This creates strength and definition tailored to your body, making every practitioner’s physique unique. Unlike conventional workouts, yoga tones your muscles while enhancing flexibility and overall body awareness.
Body toning with yoga vs. traditional Exercises
Most conventional workouts especially those relying on weights and machines—focus on reducing fat and building every muscle group evenly. This can give the classic “chiseled” look, but it often feels somewhat unnatural.
Our bodies aren’t designed to eliminate every trace of fat. A healthy layer of fat protects our joints and muscles from impact and injury. Similarly, not all muscles are meant to be developed equally. Some areas need to remain leaner to maintain flexibility and a full range of motion. For instance, overbuilding the shoulders and neck to match the chest, biceps, and triceps can restrict natural movement in the shoulder joints.
Yoga, on the other hand, tones your body by enhancing strength and flexibility together, creating a balanced, natural physique without compromising mobility.
How yoga shapes your body?
Imagine combining the curves and glow of a pageant contestant with the strength and tone of a bodybuilder that’s the kind of body yoga can help you achieve.
Yoga shapes your body in a subtle, balanced way. It leaves a thin layer of fat around your joints and key muscle groups, giving your physique a soft, natural appeal—something often missing in rigid, heavily muscled bodies. This gentle toning not only enhances your skin’s radiance but also ensures your muscles look strong without appearing harsh or overdeveloped.
With yoga, your body becomes graceful, strong, and flexible. It’s a form of toning that supports healthy function, allowing you to move freely while building strength and stability. In essence, a well-toned yoga body is not just about appearance it’s about cultivating a healthy, functional, and balanced physique.
What to expect from yoga?
Yoga is a journey, not a quick fix. Unlike weight-based exercises, the body toning you achieve through yoga takes time but the results are long-lasting and natural, without the need for supplements or shortcuts.
Many start yoga aiming for a toned physique, and that goal is certainly achievable. But as you immerse yourself in the practice, the benefits go far beyond appearance. Within a few months, you may notice a more disciplined mind, improved focus, conscious breathing, and better posture.
Yoga builds lean, well-aligned muscles that give a toned yet graceful appearance. Muscles develop in balance with your skeletal structure, ensuring proper blood flow, oxygenation, and nerve stimulation. This reduces the risk of injury during and after practice. Over time, key areas such as your abs, arms, and legs gain the perfect blend of strength, firmness, and suppleness, creating a functional and aesthetically pleasing physique.
Best yoga poses for body toning
Yoga is a powerful way to transform your body because most poses engage multiple muscle groups simultaneously. Unlike traditional workouts that often isolate a single muscle, yoga works your body as a whole, improving strength, balance, and flexibility together.
Different poses target different muscles with varying intensity and angles. To achieve complete body toning, it’s important to combine a variety of poses in your routine. The best part? The only resistance you use is your own body weight, making yoga a safe, effective, and natural way to sculpt your body.
1. Bridge Pose (Setu Bandha Sarvangasana)
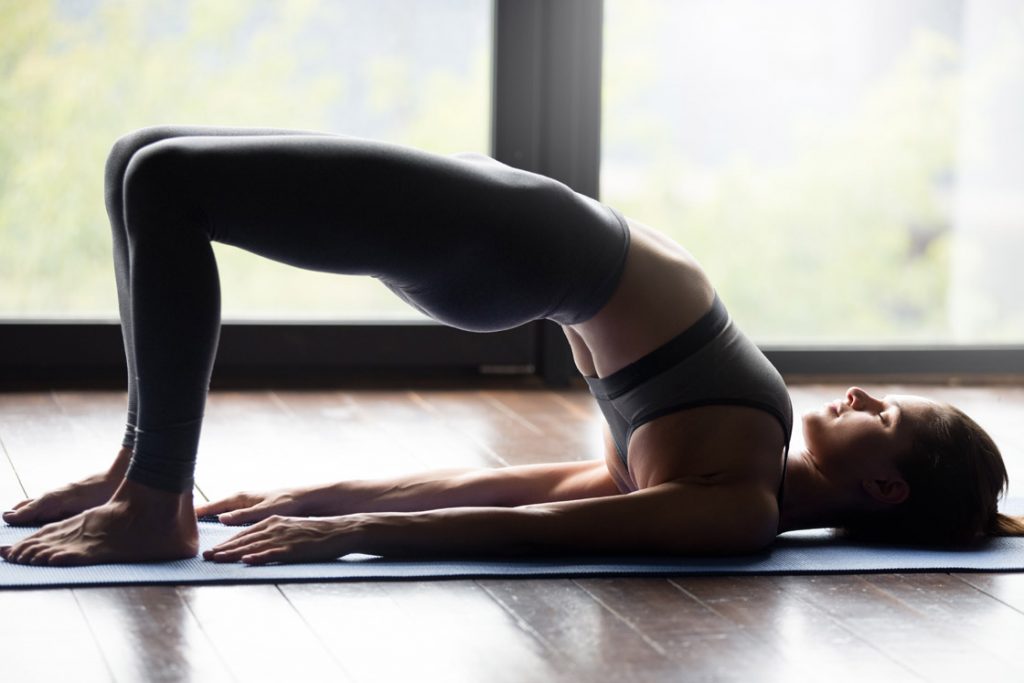
The Bridge Pose strengthens both muscles and internal organs. It improves cardiovascular and respiratory function, stimulates metabolism, supports hormonal balance, and enhances nervous system activity.
For body toning, it targets the hamstrings, quadriceps, glutes, lower back, shoulders, abs, biceps, and triceps.
How to do
- lie supine on your back.
- Keep your legs joined.
- Keep your hands by the sides of your body.
- Bend and fold up your legs, while still keeping them joined.
- Press down on the ground with your hands and push your pelvis upward.
- Use your abs, lower back muscles, hamstrings, quads, glutes and chest muscles, to power your pelvis lift.
- Push your pelvis till it reaches the height of your knees.
- Your chest should come on to your chin.
- Your shoulders and shoulder blades should not be lifted off the ground.
- Keep your hands firmly pressed down, and keep the involved muscles active for the hold.
- Look towards your heart and hold the pose.
- Hold for 5-7 breaths.
Note: As you lift up your pelvis, your knees will tend to extend outward. To avoid this strap your thighs together, just over your knees. While lifting up your pelvis be conscious of your weight distribution. Let all the muscles involved give equal support. Over-straining a particular muscle could result in injury.
2. Warrior I pose (Virabhadrasana I)
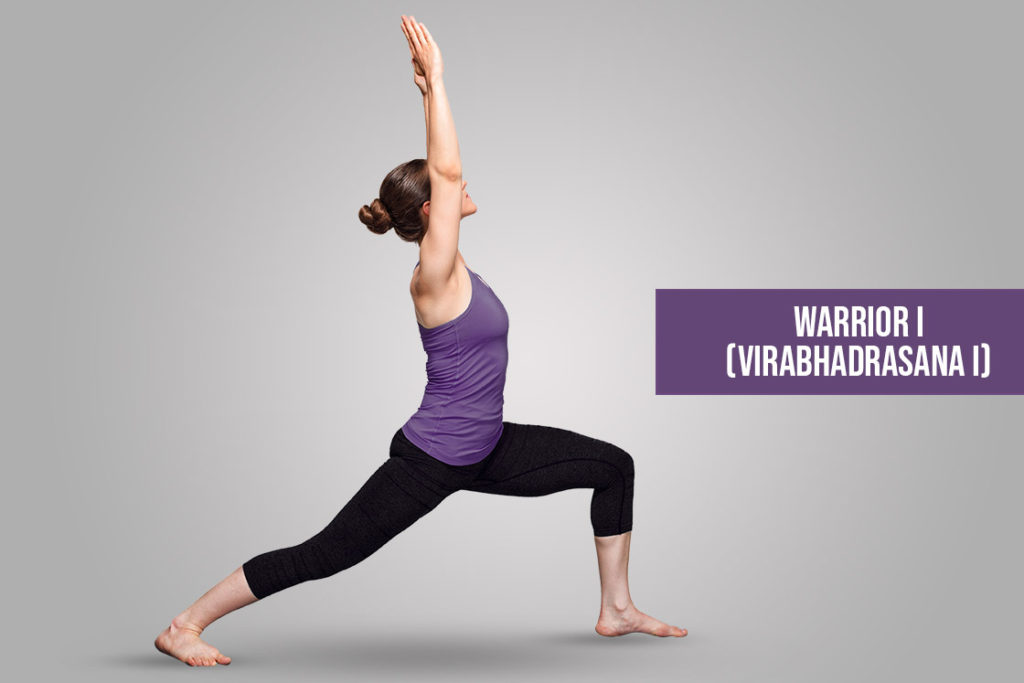
Warrior I is excellent for your circulatory system and peripheral nerves. It’s ideally a strength building and body toning exercise, and thus naturally makes way into this list.
This pose is a variation of lunge that works primarily on your legs muscles, with some added toning for your lats, front abs, upper and lower back and shoulders. Warrior I is one of the best poses to increase flexibility as it puts your legs through intense stretching.
How to do
- Stand straight with your legs wide apart.
- Keep 3-4 feet gap between both your feet.
- Turn your right toe to your right by 90 degrees
- lift your left foot on your left toe, and rotate your left heel towards your left by 90 degrees, and then drop it down on the ground.
- As your rotate your left heel to your left, turn from your torso to your right by 90 degrees.
- Your initial right should be your current front.
- Lunge forward by pushing your body towards your right leg, and bend your right knee.
- Keep lunging till almost your right thigh is parallel to the ground, and right lower leg is almost at 90 degrees with the floor.
- Your left leg should nicely stretch behind.
- Raise your hands overhead, and join your palms in Anjali mudra.
- Hold the pose for 5-7 breaths.
- Repeat the pose with left leg forward.
Note: As you lunge forward do not lean over your right leg. Your body should be centred between your legs, and spine erect. If you have a leg injury, try to have a wall on either side or both sides. Hold against the wall/walls as you lunge to adjust the load on your legs.
3. Warrior II pose (Virabhadrasana II)
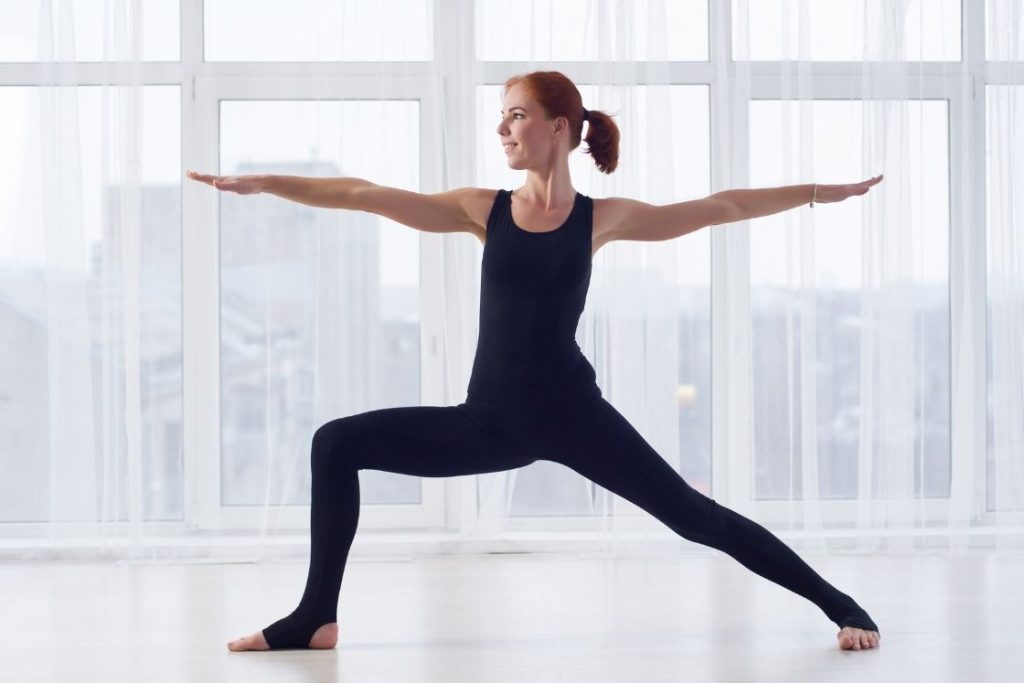
Warrior II is also a variant of lunge, that also works to enhance your circulatory system and peripheral nerve stimulation.
Once again this pose primarily builds strength in your legs and tones the muscles. However, warrior II modifies on Warrior I by adding hand stretching that lay emphasis on the toning of your lats, shoulders, biceps and triceps. The leg stretching also receives a pull from a different angle that diversifies their flexibility.
How to do
- Stand straight with feet wide apart.
- Keep 3-4 feet gap between both feet.
- Turn your right toe to your right by 90 degrees.
- Turn your left toe to your right by 45 degrees.
- Don’t turn your upper body to either side, keep facing your front.
- Now lunge to your right by pushing your body towards your right, and bend yo
- Keep lunging till your left leg is stretched out straight, and your right thigh is almost parallel to the ground and right lower leg is almost at 90 degrees to the ground.
- Raise your arms to your shoulder level at the sides of your body, and stretch them out straight.
- Turn your head to your right and look towards your right hand.
- Hold your pose for 5-7 breaths.
- Repeat the pose on the other side.
4. Half Moon pose (Ardha Chandrasana)
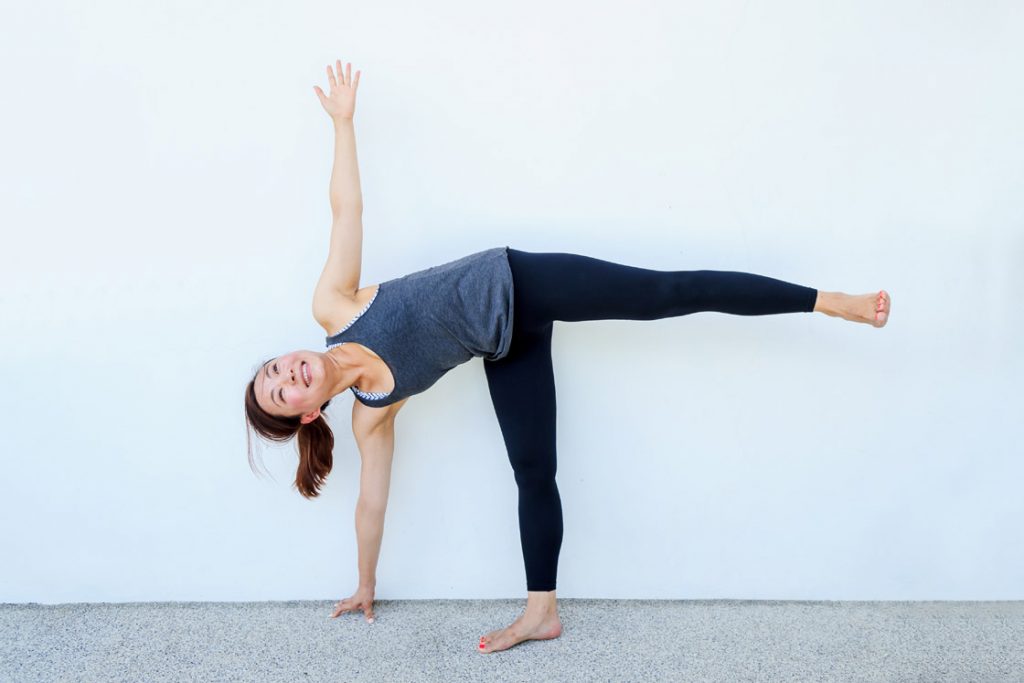
This pose is very good to improve your motor functions and muscle balance.
For body toning, half moon pose serves a very specific purpose. This pose dedicatedly focuses on your side abs, side hamstrings and lower back muscles, although you will require different muscle groups, especially in your legs, abs and back to come into this pose.
The importance of half moon pose for body toning comes from the fact these three muscle groups (side abs, side hamstrings and lower back muscles) get a little movement in our day-to-day activities.
How to do
- Stand with your right leg forward and left leg backward.
- Keep 4 feet gap between both your legs.
- Shift your entire weight on your right leg and lean forward.
- Bend down all the way to drop your hands to the ground.
- Your left leg should automatically come up as you bend down.
- Keep your left leg to the level of your left shoulder.
- Turn your body to your left and stretch straight your left hand upwards.
- Slowly turn your gaze to your left.
- Hold the pose for 5 breaths.
- Repeat the pose on the other side.
Note: Remember the leg and arm length varies from person to person. Ideally, the pose sees your upper body and the lifted leg, both being parallel to the ground. However for some people, to touch the ground you will have to bend your body further towards the ground. In such a case you can either lift the leg further up to keep in line with your body, or let it remain stretched at a level parallel to the ground.
5. Tree pose (Vrikshasana)
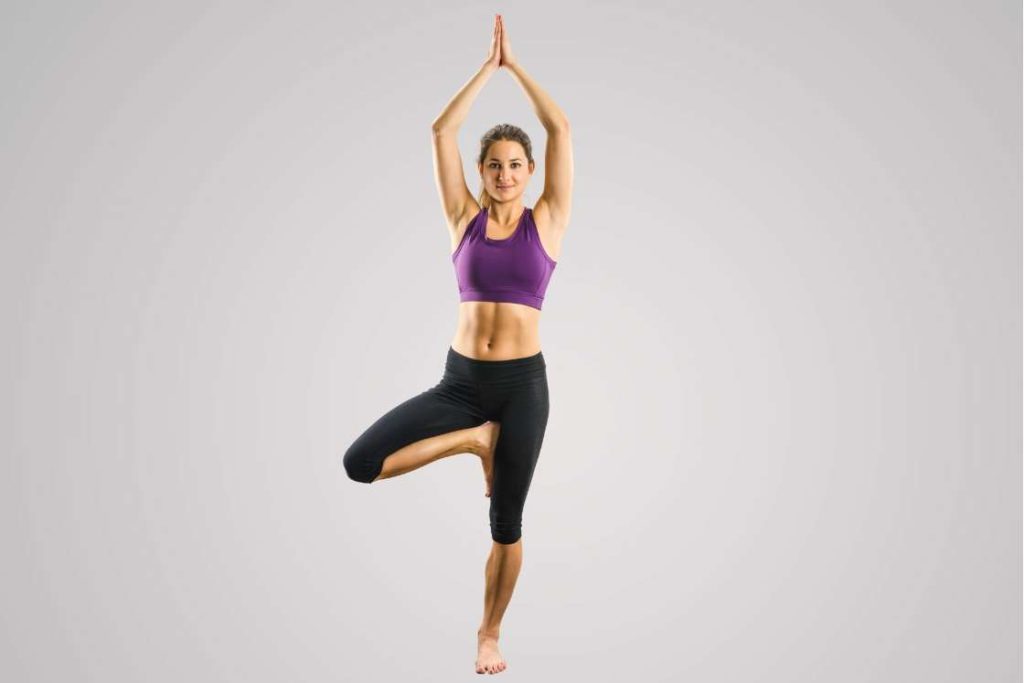
Tree pose like the half moon pose is a popular balancing pose, that also happens to stimulate your nervous system, metabolism and improve your blood flow. This pose will train your nerves to gain control over different muscle tissues in your legs, body and arms. This control will prove elemental in properly performing other toning exercises. Tree pose will also improve your concentration and conscious breathing. Finally, this pose will have a significant impact on improving your posture.
How to do
- Stand in a mountain pose.
- Shift your weight on your right leg, and lift your left foot off the ground.
- Balance your entire weight on your right leg and lift up your left foot and rest it against the inside of your right thigh.
- Raise your hands overhead and join your hands in Kailash Mudra exactly over your head.
- Breathe consciously and keep your spine erect.
- Try not to wobble.
- Hold your pose for 30 seconds.
- Repeat balance on your left leg.
Note: As you get the hang of the balance increase the hold up to a couple of minutes. As a beginner, if you are having difficulty balancing, place a chair under your lifted knee as support.
6. Plank Pose (Phalakasana)
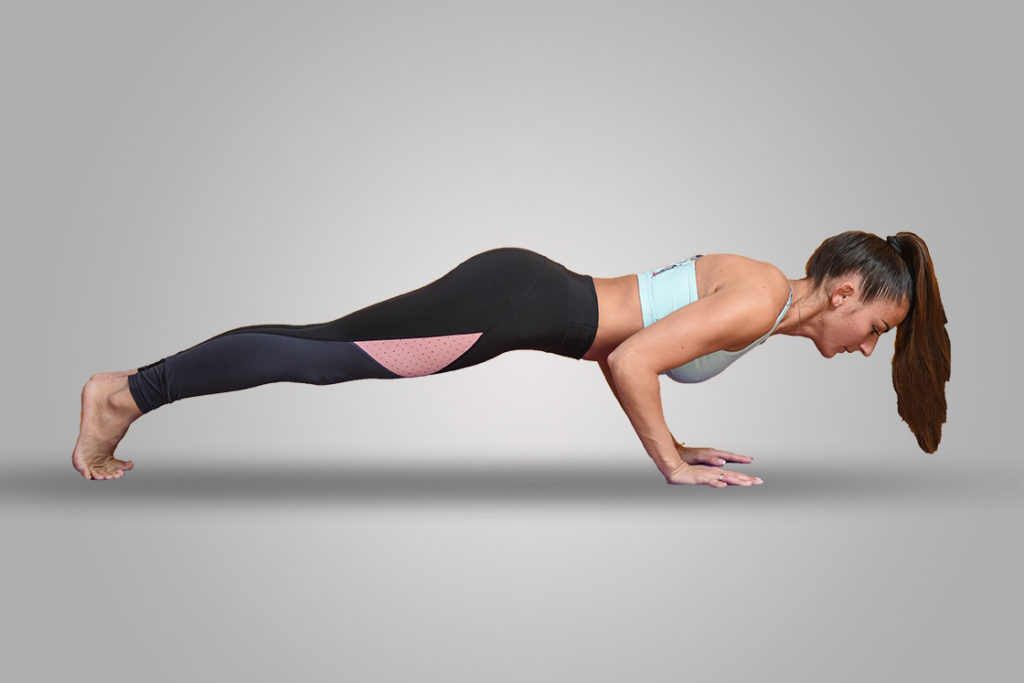
Plank pose is an elemental strength-building pose in almost all forms of exercise across the globe.
This pose is generally considered as a preparatory pose to many other intermediate and advanced level exercises, but it can also independently act as a body toning pose.
The purpose of plank pose is not to train your muscles for withstanding high intensity, but for withstanding considerate intensity for a longer duration. In a way one could say, that plank pose increases the endurance of your muscles. This pose interestingly works on almost every single muscle group in your body.
How to do
- Get down on your all fours, your hands and knees.
- Your wrists should be under your shoulders and knees should be below your hip.
- Keep your knees and feet hip width apart.
- Lift your knees off the floor and stretch out your legs straight outward.
- Use your hand muscles, leg muscles, abs, chest muscles, shoulders and upper back muscles to hold your bodyweight.
- Breathe comfortably and steadily.
- Lookin front.
- Hold the pose for atleast 30 seconds.
Note: If you are an intermediate level practitioner with decent muscle strength, 30 seconds should be bare minimum. The more you can hold it will be better. Aim to practice the hold for 2-5 minutes. You should be able to reach from 30 seconds to 3 minutes in only a month.
7. Four limbed staff pose (Chaturanga Dandasana)
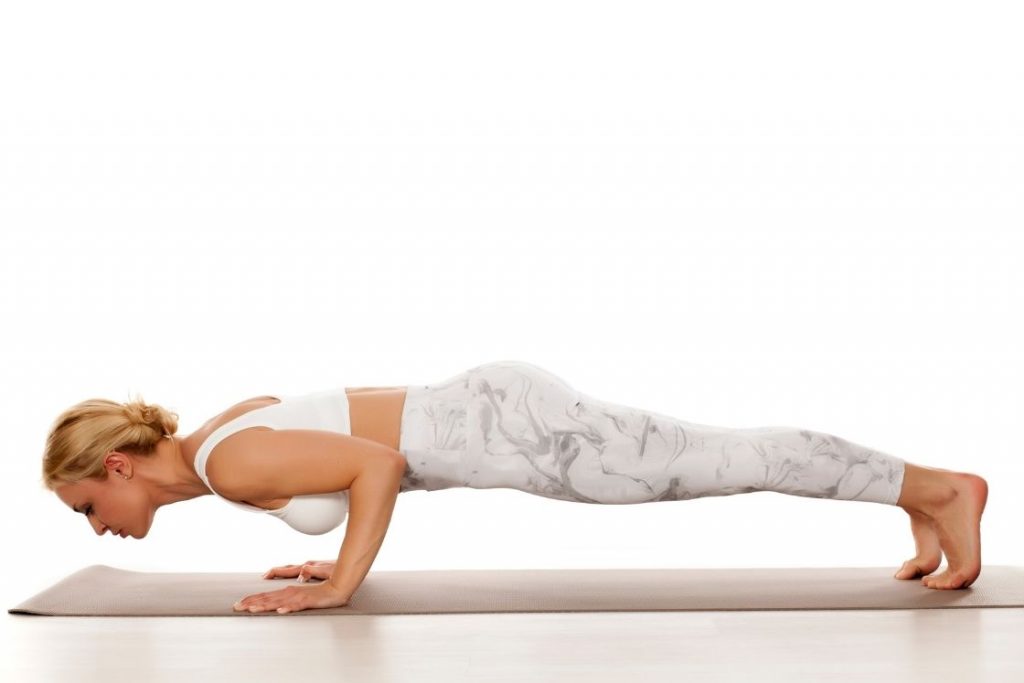
This is a variation of the plank pose, that retains all the holistic and endurance building benefits of the plank, and then increases the body-toning benefits.
The four-limbed staff pose significantly increase the exercise in your arms, biceps, triceps and abs.
How to do
- Get into a plank pose.
- Bend your elbows and bring your body down half way to the ground.
- Come down to a point, where your upper arms are parallel to the ground.
- Hold your pose here and breathe steadily.
- Hold this pose for 30 seconds. Go upto a minute if you can.
Note: Your elbows will have a natural tendency to extend outward as you bend down. Let that not be the case. Keep your elbows close, almost touching, to your body.
8. Reverse plank pose (Purvottanasana)
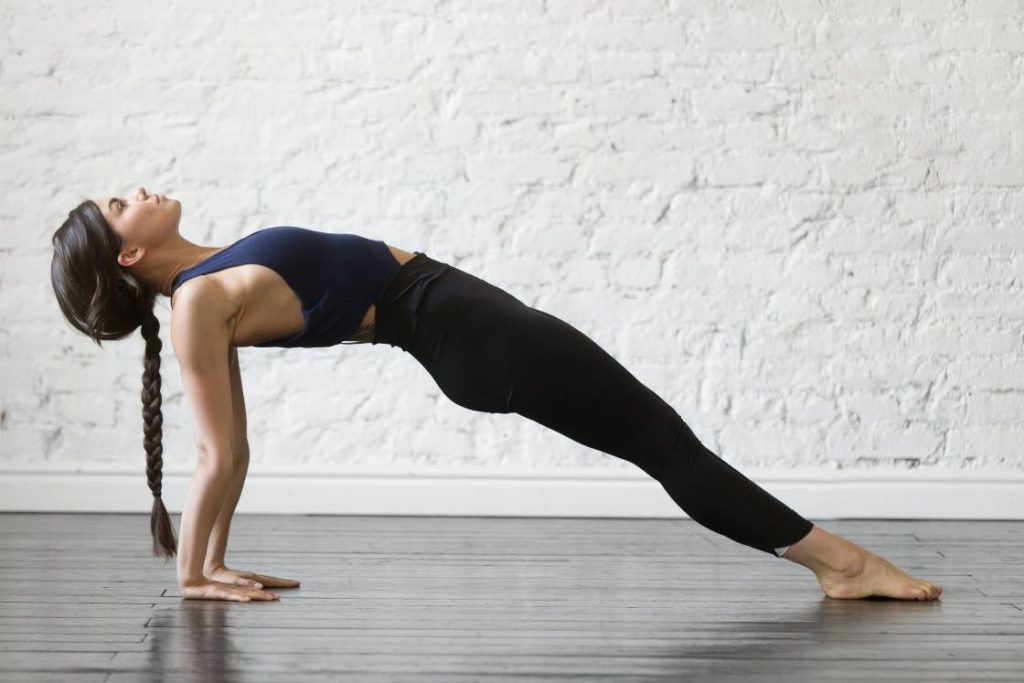
The reverse plank unlike the plank pose is more of a body toning pose.
Reverse plank, or also known as upward plank pose, is the pose you want to get some extra toning in your biceps, triceps, shoulders and abs. The reverse plank works on the exact opposite angle to that of the four-limbed staff, thus affecting the similar group of muscles but training in a different range of motions. The reverse plank also helps you tone your quadriceps and hamstrings.
How to do
- Sit in a staff pose
- Lean back and rest your shoulders directly under your shoulders.
- Now lift up your elbows and place your hands in their stead.
- Push against the ground with your hands, lift your buttocks off the ground and Push your pelvis upward.
- Keep your legs stretched and joined.
- Push your chest upward to stretch the muscles.
- Also push upward your abs, to form a nice upward arch in your spine.
- Hold your pose for 5-7 breaths.
Note: You will probably have a bit of issue with your head and neck at the start. Try not to keep your neck and head region stiff. Free your head from your neck region, roll your shoulders back and keep them dropped down.
9. Side plank Pose (Vasisthasana)
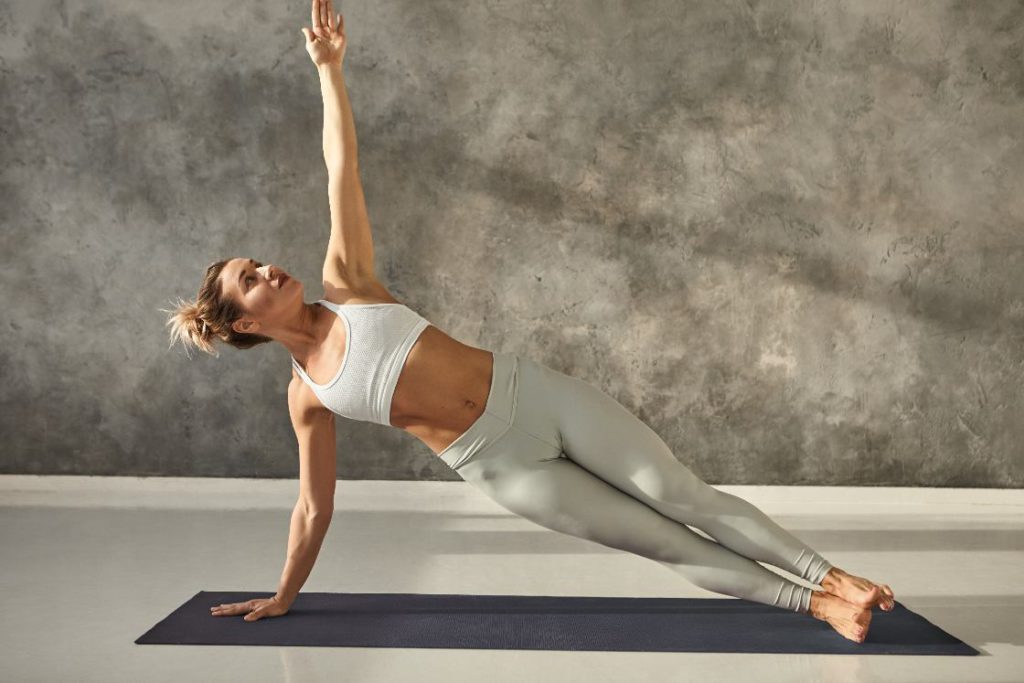
Yet another variation of the strength building series of plank, is the side plank. Side plank, like its name, is helpful in toning many of the side muscles. The side plank comes particularly handy in toning the triceps, side abs, inter-rib muscles and side hamstrings.
10. Chair Pose (Utkatasana)
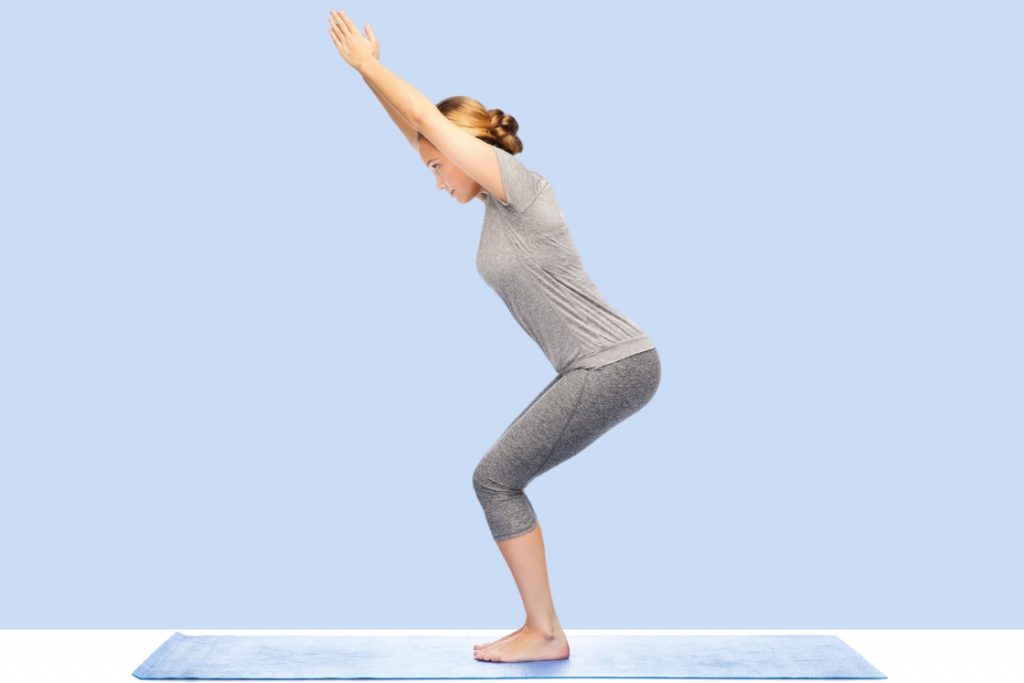
Chair pose is essentially a yogic variant of the squat. The chair pose is brilliant for toning your legs, with special emphasis on your quadriceps and calf muscles. The chair Pose has other benefits like improving bowel movements, digestion and metabolism.
How to do
- Stand in a mountain pose.
- Keep your legs and feet hip width apart.
- Slowly sit down in a squat.
- Sit down to a point your thighs are parallel to the ground.
- Join the palms of your hand infront of your chest in Anjali Mudra.
- Breathe steadily and hold the pose for 20 seconds.
Note: To add an increased toning to your abs, twist your torso, and turn once to your left and once to your right. The chair pose normally tones your legs, but adding the twist benefits your entire abdominal region as well.
11. Boat pose (Navasana)
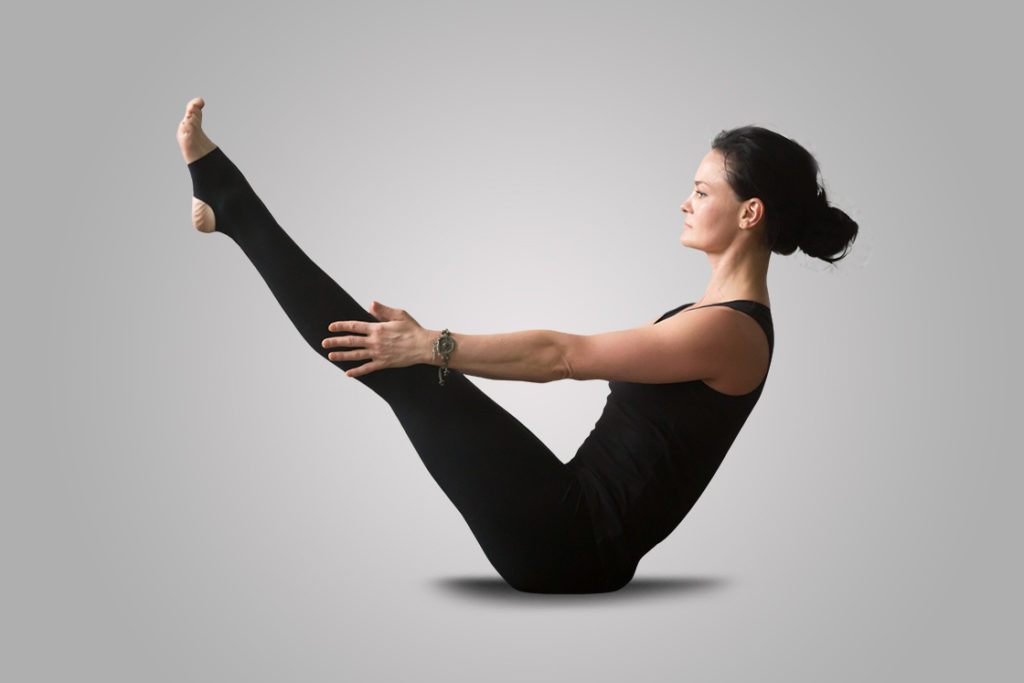
The boat pose is a pose for your abdominal region. This pose can benefit many of your abdominal organs like your intestines, livers, stomach and kidneys. Consequently, this pose improves a wide range of abdominal functions, including hormonal activities, excretion and digestion. In terms of body toning, the boat pose has superior results in toning your abs region.
How to do
- Sit in a staff pose.
- Bend and fold up your legs.
- Recline back to a point after which you feel like falling.
- Hold your body at this posture
- Lift your lower legs upward, till they are parallel to the ground.
- You will be solely balancing on your sitting bones.
- Breathe steadily and hold your pose.
- Hold for 7 breaths or 15 seconds.
- Keep your hands by the side of your knees.
Note: If you have difficulty lifting your legs, you probably have low hamstring strength. Support your hamstring with your hands. You can continue to support your hamstrings even during the hold.
12. Downward facing dog (Adho mukha svanasana)
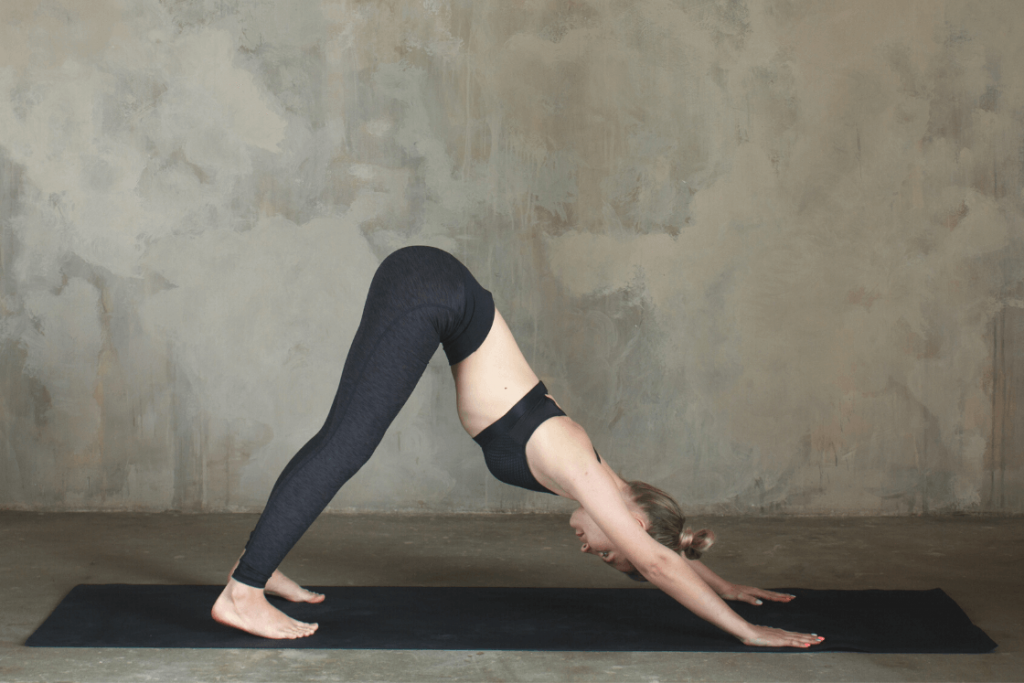
Downward facing dog is the most complete body toning exercise in yoga. In this long list of poses, you can leave a few other poses if you lack the time, but not this.
For beginners, the downward-facing dog works on all the muscle regions in your legs, abdomen, back, chest, shoulders and hands. And then, this pose not only increases the strength and flexibility but also promotes the growth of new muscle tissues and stimulates your nervous functions.
How to do
- Get down on all fours, your knees and hands.
- Keep your hands exactly below your shoulders, and knees below your hips.
- keep your knees and feet hip width apart.
- Lift your knees off the floor and push your buttocks backward and upward.
- Keep pushing upward and backward till you can straighten your legs and plant your heels on the ground, and stretch your arms straight.
- Push your chest downward and stretch your upper body.
- Try looking towards your feet.
- Hold the pose for 5 breaths or 10 seconds.
Note: Initially, and especially if you are a beginner, you can keep a slight bend to your knees, and stand on your toes. Don’t force your knees to straighten to avoid injury. A good way to judge if your knees are pushing their limits, is to check if you are feeling stress under your kneecaps or at the sides of your kneecaps.
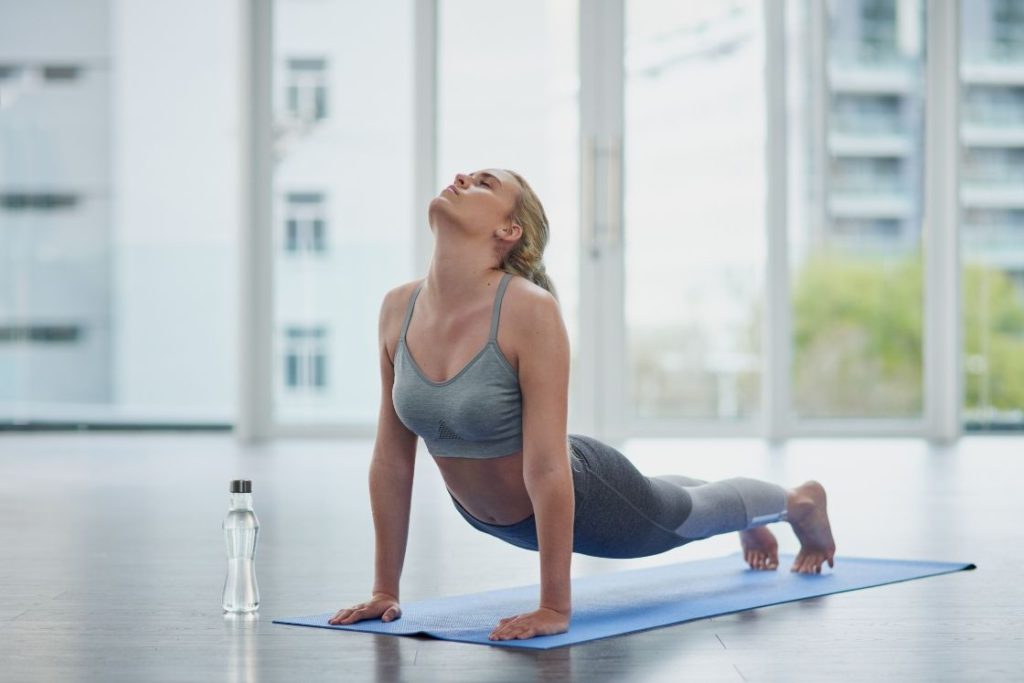
13. Upward facing dog (Urdhva Mukha Shvanasana)
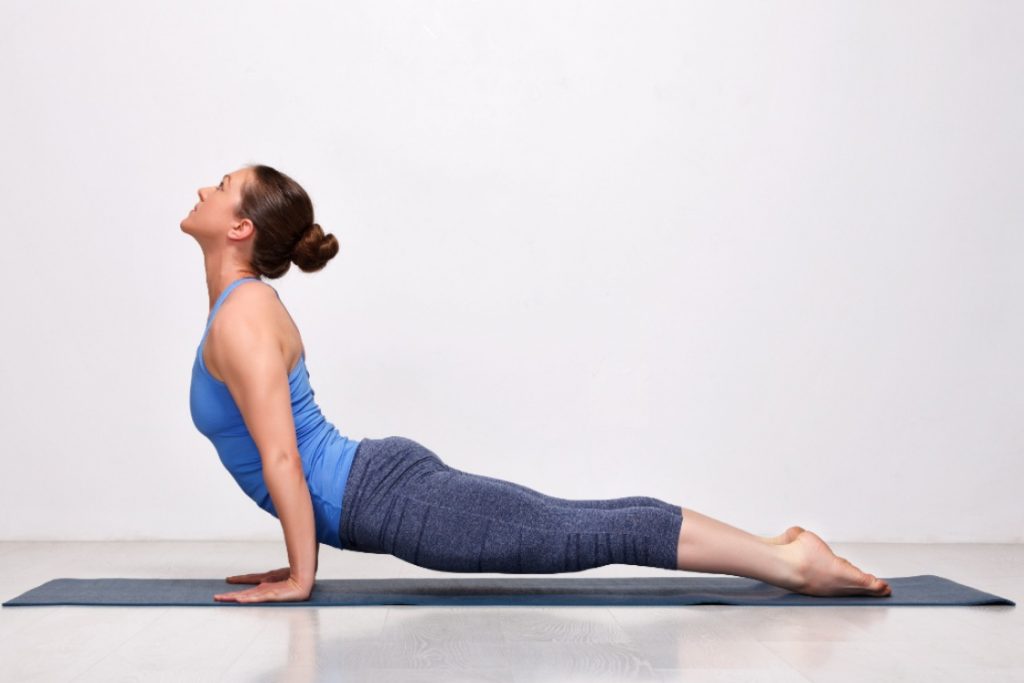
Upward facing dog is usually sequenced with the downward-facing dog and is believed to have a complementing effect on the same muscle groups. This pose also enhances your metabolism, nervous functions, cardiovascular function and blood flow.
Every time you perform a downward-facing dog, follow it up with the upward dog, they both sort of complete each other.
How to do
- Lie down on the front of your body.
- Bring your hands to the sides of your chest and plant your palms on the floor.
- Push with your hands against the floor and arch up your body and spine.
- Arch up your entire spine, and keep arching up till your hands are straight, and you and your chest are facing the front.
- Nicely puff out your chest region, roll your shoulders firmly downward, and prominently separate your head from your neck.
- Your legs should be on your toes.
- Alternatively you can drop down your knees to the ground.
- Hold the pose for 10 seconds or 5-7 breaths.
Note: If you want to sequence it with downward facing dog, simply dip forward from downward dog, and rise up automatically into the arch. Both the pose will be connected in a single flow. You can continuously repeat the flow 3-4 times, for better toning.
Conclusion
You don’t need to practice all the yoga poses every day, especially if time or energy is limited. Instead, choose a few poses that collectively target all the major muscle groups. Alternatively, you can spread them over 3–4 days, focusing each session on a specific area such as abs, legs, or arms and shoulders.
For effective body toning, consistency, rest, and nutrition are just as important as the poses themselves. A balanced diet provides the nutrients your muscles need, while proper rest helps prevent injury and supports muscle growth. With this holistic approach, yoga can help you achieve a toned, strong, and graceful body naturally and sustainably.