

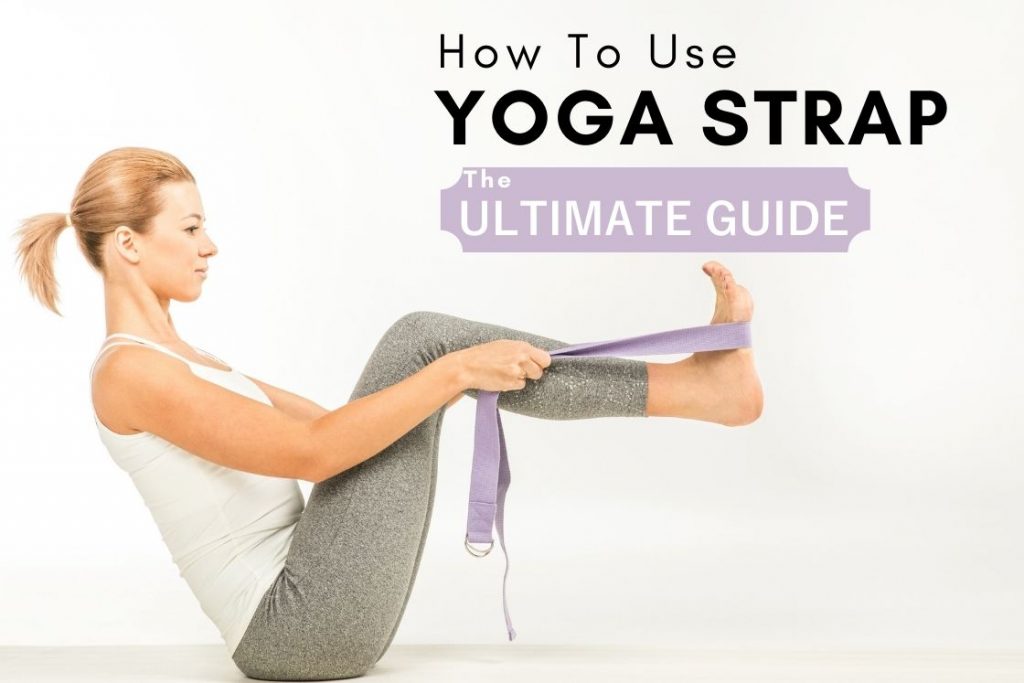
A yoga strap extends your reach, supports alignment, and helps you move into stretches safely. This guide explains the different types of straps and provides step-by-step stretches for shoulders, hamstrings, hips, lower back and neck.
What is a yoga strap and why use one?
Using props is common in many yoga traditions. Styles like Iyengar, Restorative, and Yin depend on props for support, and straps are also used widely in Hatha classes. A yoga strap is one of the simplest and most effective tools for deepening stretches, improving alignment, and making poses more accessible.
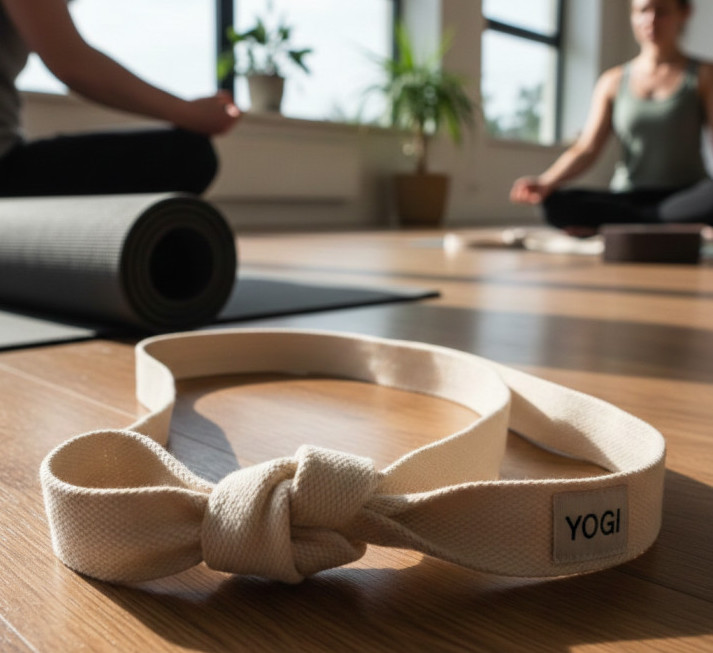
Most straps are made from cotton or hemp and come in lengths between 6 and 9 feet. A buckle or ring is often attached to one end to create adjustable loops. Whether you are a beginner or an advanced practitioner, a strap helps you move safely, avoid strain and find better form in your practice.
Quick guide: who should use a yoga strap?
A yoga strap is helpful for:
- Beginners who cannot reach their toes or clasp hands behind the back
- Anyone with tight hamstrings, hips or shoulders
- Practitioners wanting to deepen stretches safely
- People recovering from stiffness due to desk work or long sitting
- Advanced practitioners refining alignment or exploring deeper variations
Benefits of using yoga straps
A yoga strap is a simple tool that supports the body and helps you move with better control. It is helpful for beginners, experienced practitioners, and anyone working with stiffness in the shoulders, hips or hamstrings. By adding length and stability, a strap allows you to enter poses safely and stay aligned without strain.
Here are the main benefits of practicing with a yoga strap:
1. Helps you reach further: A strap acts like an extended arm and lets you reach areas you normally cannot. For example, if holding your toes is difficult in a seated or standing pose, placing your foot in a loop helps you lift and lengthen the leg without rounding the back.
2. Supports alignment: If you struggle with posture, a strap can guide your shoulders, back, or legs into a healthier position. It is a valuable tool for learning how a pose should feel, especially when you are new to the practice.
3. Deepens stretches: Using a strap allows you to move into a stretch with control. This helps you open tight muscles safely, improve flexibility, and work towards more advanced shapes at your own pace.
4. Builds strength and endurance: A strap can add gentle resistance, which helps you engage the right muscles and hold poses for longer. This improves stamina and stability in standing, seated, and supine postures.
5. Prepares the body for practice: Straps are useful in warm-up movements. Simple stretches with a strap help loosen the shoulders, legs, and back so the body feels ready for your session.
6. Reduces strain on the core: When used under the soles of the feet and pulled gently with the arms, a strap can ease tension in the abdominal area. This is helpful in poses that rely on balance or core control.
7. Makes poses more comfortable: Because a strap supports your reach and alignment, it reduces unnecessary strain. This allows you to stay in poses longer, breathe with ease, and enjoy the full benefit of the posture.
8. Improves body awareness: The extra stretch and feedback from the strap help you notice where tightness or imbalance appears. You become more aware of how each pose affects your muscles, joints, and connective tissues.
9. Supports people with tight hips, hamstrings, or back Pain: A strap helps release tension in tight areas, making many poses easier and safer. It also prevents the spine from rounding in seated or forward-bending asanas, which is often the cause of lower back discomfort.
Different types of yoga straps you can choose from
1. Simple Yoga Strap (with no buckle or ring)
This type of strap has no metal or plastic ring at either end. It is straightforward to use and is often preferred by beginners. Many students choose it because it feels light, easy to handle, and keeps the practice quiet. Since there is no buckle, you avoid the clicking sound that sometimes disturbs the calm of the yoga room.
A simple strap is practical for people who do not want to deal with threading a loop through a ring or adjusting a buckle. You create the loop yourself, so once you set it to the length you need, you can move through your practice without stopping to adjust it again.
The only drawback is that the loop must be tied well before you start. If the knot is loose or not set to the right length, it may affect your alignment during the pose. It takes a little practice to learn how to fasten the strap firmly so it stays in place.
2. D-ring yoga strap
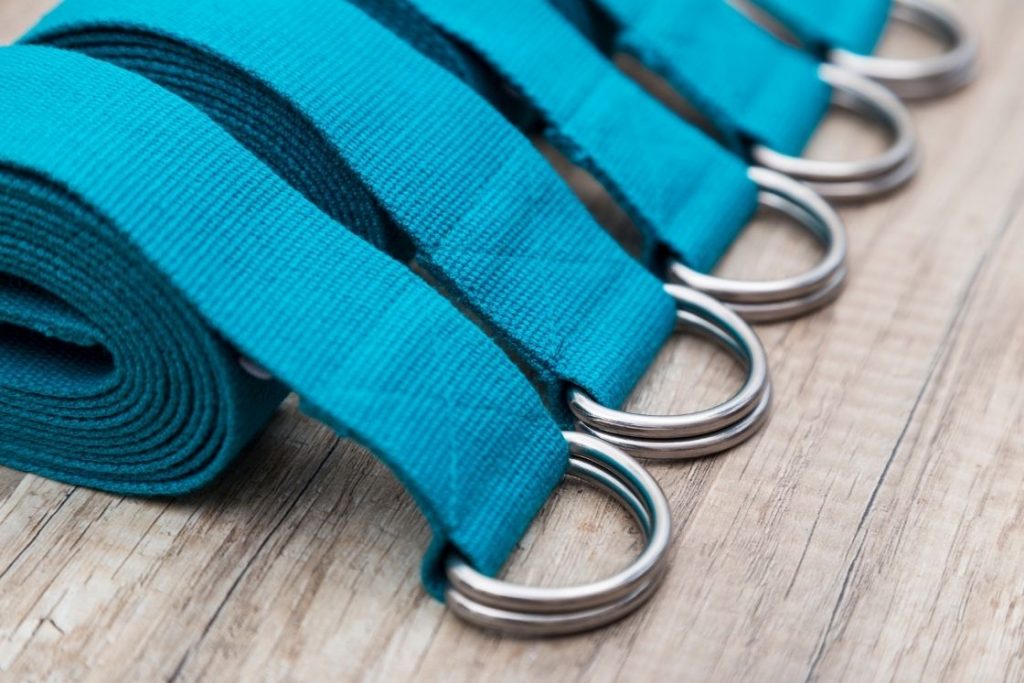
As the name suggests, this strap has metal rings shaped like the letter D. It is one of the most common straps used in yoga classes. A typical D-ring strap has two metal rings on one end, while the other end is plain. The plain end is threaded through the rings to create the loop you need.
To set it up, take the plain end through both D-rings and fold it back over. The free end will now sit on top of the rings. Next, guide this end through only one of the D-rings to tighten the loop. This holds the strap firmly in place.
A D-ring strap is helpful when you want quick and precise adjustments based on the pose you are practising. You can use it to lengthen your reach, support your back, and maintain better posture. It is especially useful for tall practitioners or anyone who needs extra extension during stretches.
Always check that your strap is set up correctly before you start. If the loop loosens or slips during a pose, it may lead to strain or injury.
3. Cinch buckle yoga strap
A cinch buckle strap looks similar to the buckles you often see on school bags. Most come with a plastic buckle, though metal options are also available. A cotton strap with a cinch buckle is a popular choice because it is strong, dependable, and easy to handle.
One of its key advantages is that you can adjust it with one hand. This means you can tighten or loosen the loop without breaking your flow in the middle of a pose. The plastic buckle holds the strap firmly in place, as the free end grips securely against the anti-slip design of the cinch.
This type of strap is ideal for practitioners who want quick adjustments during class and prefer a buckle that stays locked without slipping.
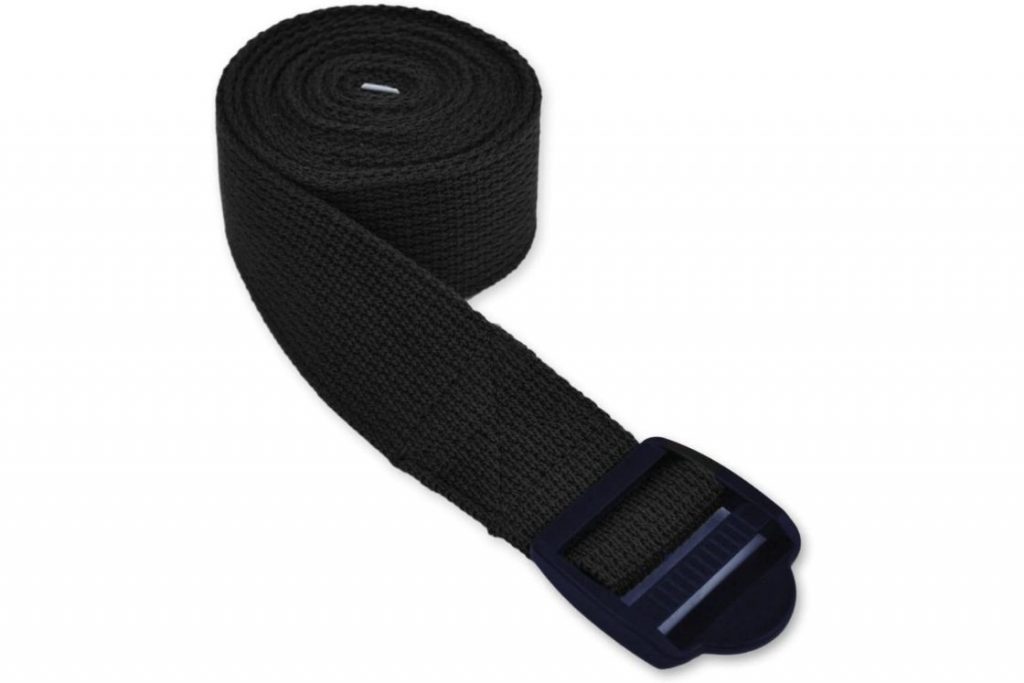
4. Pinch Buckle Yoga Strap
This strap uses the familiar black plastic buckle where one end has a hollow slot and the other end has two prongs. The prongs slide into the hollow buckle and lock in place with a firm click, letting you know the strap is secure.
A pinch buckle strap is easy to adjust with one hand, so you can tighten or release the loop without stepping out of your pose. The plastic buckle grips the strap well, holding it firmly in its grooves. This gives you confidence that the strap will stay in place and not loosen during your practice.
Yoga strap stretches and poses
A yoga strap can be added to many poses and basic stretches to help you reach your toes, open the shoulders, release tight hamstrings, and gradually build flexibility. It supports your body so you can move safely and work deeper without strain.
Below are some poses and stretches you can practice with a yoga strap.
Yoga strap stretches for shoulders
If you spend long hours at a desk, you may often feel tightness across the shoulders and upper back. A yoga strap can help release this tension by opening the chest and easing the strain around the shoulder blades. Even a few minutes of strap work can make your upper body feel lighter and more relaxed.
1. Shoulder strap circles
This stretch can be done at any time you feel stiffness in your shoulders or upper back. Using a simple strap helps you keep the arms straight, steady, and evenly spaced.
How to do it
- Sit in Vajrasana or stand tall with your spine straight.
- Hold the strap in both hands with your arms stretched forward. Keep your hands wider than shoulder-width.
- Hold your arms in front of you for a few seconds, then lift them slowly above your head. Pause here for another 5–6 seconds.
- From here, take your arms back as far as is comfortable. In the beginning, the movement may feel limited, so stop at the point where you feel a gentle, relieving stretch.
- If you feel discomfort, bring your arms back overhead or widen your grip on the strap.
2. Cow Face Pose
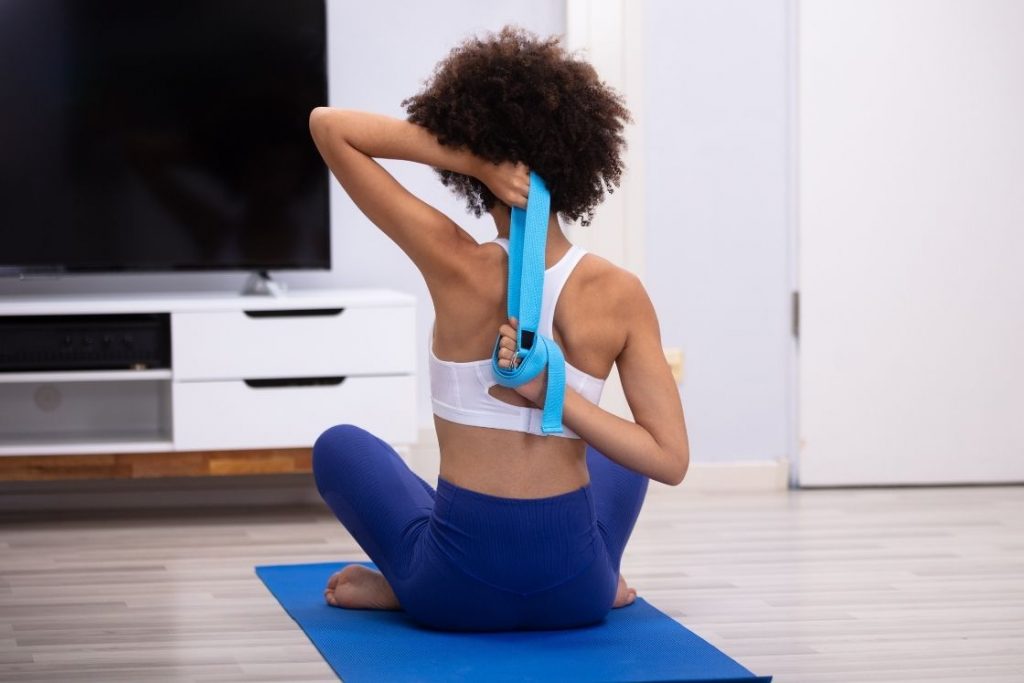
Cow Face Pose stimulates many key areas of the body including the ankles, hips, elbows, shoulders, and chest. For tight shoulders, it is especially helpful. In this pose, the hands clasp behind the back to release tension around the shoulders and shoulder blades. But for many people, one side is easier than the other. A strap helps bridge this gap by shortening the distance between the hands so you can enjoy the full stretch without strain.
New practitioners also benefit from using a strap, as it helps build strength and flexibility in the shoulders over time.
How to do it
- Sit in Dandasana with your spine straight and legs extended. Bend your knees and place your feet on the floor.
- Slide your left leg under your right so the left knee comes directly beneath the right. Cross the legs so the right foot rests outside the left hip and the left foot rests outside the right hip.
- Adjust the feet so your heels are equally distant from the hips. Sit evenly on both sitting bones.
- Hold a strap in your left hand and lift the arm overhead. Bend the elbow and lower the hand behind the neck.
- Take your right arm out to the side, bend it, and bring the hand to the mid-back.
- Instead of clasping the hands, hold the strap with both hands. Draw the elbows towards the centre. Rest the back of your head lightly against the upper arm to keep it aligned.
- Stay here for five slow breaths. Then release the strap and repeat on the other side.
You can adjust your grip on the strap to increase or decrease the stretch. Over time, work your hands closer together. You can also gently pull the strap up or down to mobilise the shoulders and deepen the opening.
Yoga strap stretches for hamstrings
Tight hamstrings can limit movement, affect flexibility, and even lead to aches that influence your posture. Using a yoga strap in both seated and standing poses helps you stretch the hamstrings safely and with better control. The strap supports the legs so you can release tension, improve mobility, and ease stiffness without rounding the back or straining the knees.
1. Seated Forward Bend
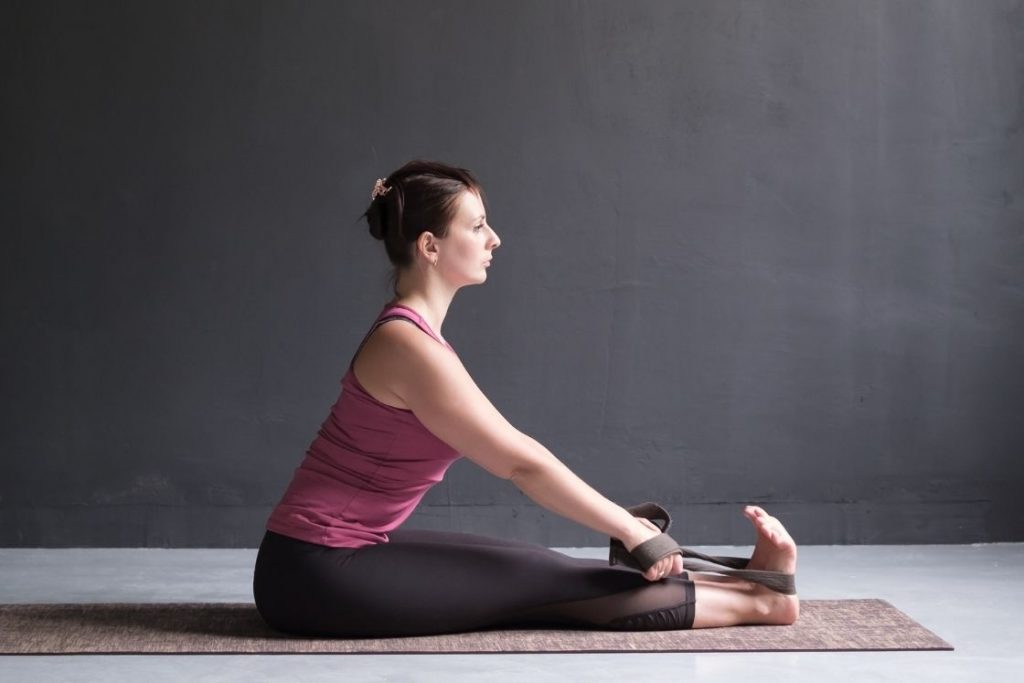
Seated poses rely heavily on the hamstrings because the legs stay straight and the movement comes from the hips. Seated Forward Bend is one of the best postures for stretching the back of the legs. However, when the knees bend or the spine rounds, the stretch becomes less effective.
A yoga strap helps you deepen the hamstring stretch by keeping the legs straight without forcing the body to fold too far. With the support of the strap, you can maintain good alignment and work safely at your own pace.
How to do it:
- Sit on your mat and loop the strap around the balls of your feet.
- Keep your spine straight and begin to extend your legs forward. Flex the feet as you straighten the legs fully.
- Once your legs are straight, hold the strap with both hands and adjust your grip to find a steady position.
- With a long spine, hinge from the hips and bend forward gently. You only need to fold as far as you feel a comfortable stretch in the hamstrings.
- Stay here for at least five breaths or longer if it feels good.
You can follow the same steps in Head-to-Knee Pose (Janu Sirsasana) for a focused hamstring stretch on one leg.
2. Reclined Hand-to-Big-Toe Pose
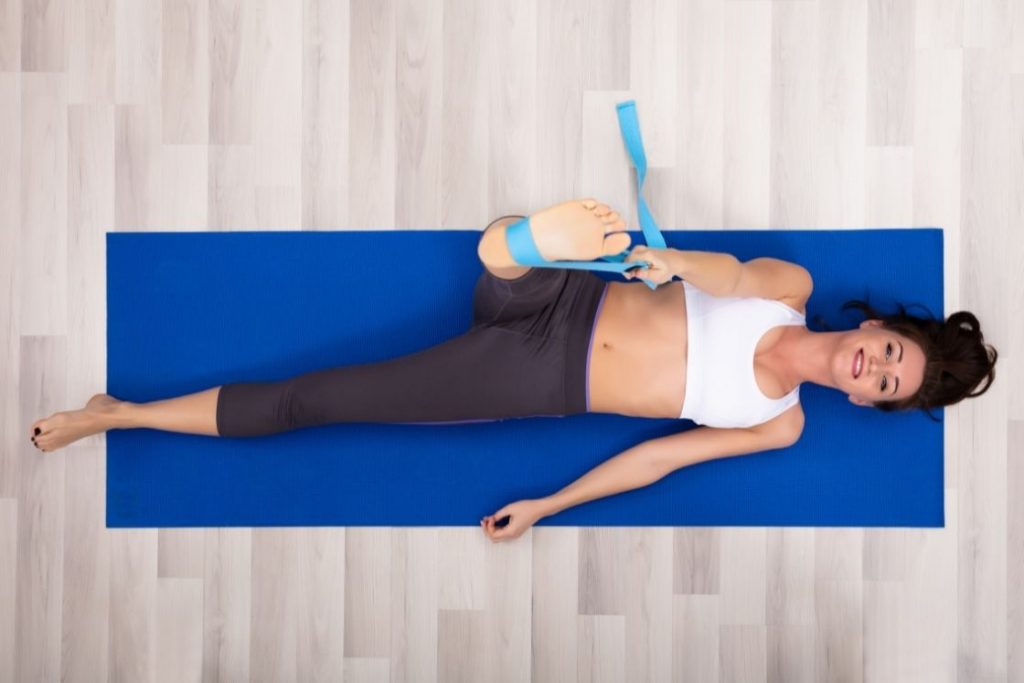
The standing version of this pose challenges balance and core strength while stretching the hamstrings and opening the hips. When practice on the back, it becomes a restorative posture that still offers a deep, controlled stretch.
Without support, many people round the spine as they try to reach the lifted foot, which can strain the neck, shoulders, and lower back. A yoga strap acts as an extended arm so you can keep the back flat on the mat and stretch the leg without bending the knee.
How to do it:
- Lie on your back and bend your right knee toward your chest.
- Loop the strap around the ball of the right foot and hold the strap firmly with both hands.
- Slowly straighten the leg toward the ceiling until it is perpendicular to the floor, or as close as your body allows.
- Keep the left leg relaxed on the mat and maintain a long spine.
- Stay here for five steady breaths, then release and switch sides.
To increase the stretch, you can let the lifted leg lower to the right side while holding the strap with one hand. Move only as far as is comfortable and keep the opposite hip grounded.
Yoga strap stretches for lower back
The lower back often carries a large share of the body’s weight and is easily affected by poor posture, long hours of sitting, and stiff or weak muscles. Many people experience discomfort or tightness in this area as a result. Using a yoga strap can help you deepen stretches in backbends and hip-opening poses, allowing the lower back to release tension safely and gradually.
1. Bow Pose (Dhanurasana)

Bow Pose is a deep backbend that opens the chest, stretches the front of the body, and strengthens the entire back. Beginners often struggle to reach the ankles or lift into the pose smoothly. A yoga strap adds extra length to the arms, helping you enter the posture with better control.
How to do it:
- Form the strap into a U shape so your shins will rest on the curve of the strap, with both ends extending toward your hands.
- Lie on your stomach and hold the ends of the strap.
- Keep the legs hip-width apart. Bend the knees and flex the feet so the strap sits across the ankles.
- Pause here and begin sliding your hands along the strap, bringing them closer to the feet as your body allows.
- Bend the knees further so the heels move toward the buttocks.
- From here, start lifting the chest, shoulders, and head while pushing the feet upward. At the same time, the legs extend away from the buttocks.
- Lift the soles toward the ceiling so the knees and most of the thighs come off the floor. Keep the pubic bone, navel, and hip points grounded.
- Keep the gaze forward and slightly up, without dropping the head back.
- Hold the pose for five steady breaths.
Using a strap helps you learn the movement safely and gradually prepares the body for the full version of the pose.
2. Bound angle pose (Baddha Konasana)
Bound Angle Pose is a classic hip opener, but it also relies on a long, straight spine for the stretch to work effectively especially in the lower back. If your back feels tight or rounded, a yoga strap provides support and helps you maintain proper alignment.
How to do it:
- Sit in Dandasana with your legs extended. Bend the knees and bring the soles of the feet together.
- Wrap the strap around the lower back and bring both ends forward.
- Pass the strap under the feet and tighten it to a level that feels supportive. A buckle strap works best here.
- Rest your hands on the knees, either in a mudra or with the palms facing up.
- Adjust the distance between the feet and the groin to increase or reduce the stretch.
- Keep the spine straight throughout, allowing the strap to support the lower back as you settle into the pose.
- Stay here for as long as you feel comfortable.
The strap encourages an upright posture, deepens the hip opening, and allows the hamstrings and lower back to relax gradually.
Yoga strap stretches for hips
The hips tend to hold a great deal of tension. Long hours of sitting, emotional stress, or past physical strain can all settle in this area, leading to tightness or discomfort. Hip-opening poses help release this stored tension, and using a yoga strap can make these stretches easier to hold and more effective.
Below are two hip-focused poses that become more accessible with the support of a strap.
1. Tree Pose (Vrikshasana)
Tree Pose challenges balance and strengthens the back and core while giving the hips a steady stretch. Many beginners struggle to place the lifted foot on the inner thigh. The foot often slips down to the knee or shin, which reduces the hip opening and may place pressure on the standing knee. A yoga strap offers support and helps you lift the leg with better control.
How to do it:
- Stand in Tadasana with your feet hip-width apart.
- Create a loop at one end of the strap and place your left foot inside it. Adjust the loop so it fits securely around the middle of the foot. Hold the free length of the strap in your left hand.
- Shift your weight onto the right leg. Engage your core and gently pull the strap to lift your left foot toward your chest.
- Turn the sole of the left foot inward and place it on the inner right thigh. If you’re new to the pose, place the foot lower on the leg and gradually work your way up with the help of the strap.
- Hold the pose for one to two minutes, then switch sides.
2. Triangle pose (Trikonasana)
Triangle Pose builds stability and strengthens the lower body while stretching the hips, hamstrings, and groin. Beginners often tilt the pelvis forward, which disrupts alignment and may cause discomfort in the hips or lower back. A yoga strap helps you sense when the pelvis shifts by providing a clear point of contact.
How to do it:
- Stand in Tadasana. Step the feet about three feet apart. Turn the right foot to face the short edge of the mat and angle the left foot slightly inward. Align the heels.
- Wrap the strap around the left foot so it sits under the heel. Take the remaining length of the strap and place it around the upper right thigh, just below the hip crease. Ensure the strap is snug.
- Extend both arms out to the sides. Reach the right arm forward and slowly lower the hand to the shin, ankle, or the floor—wherever you can reach without collapsing the chest.
- Extend the left arm up toward the ceiling. Keep both arms in one straight line with the left shoulder stacked above the right.
- Turn your head to gaze toward your left fingers. Hold for five breaths and repeat on the other side.
As you practice, notice the tension in the strap. If it loosens, it means the pelvis has shifted forward. Adjust your alignment so the strap stays firm and supportive.
Yoga strap stretches for neck
he neck is one of the most sensitive areas of the body and is often affected by everyday habits. Poor posture, long hours at the laptop, constantly looking down at the phone, muscle cramps, awkward sleeping positions, or even sudden jerks can all lead to stiffness and discomfort.
A yoga strap can help you practice simple and effective neck stretches that release tension and ease tightness. These movements can be done while sitting on a mat, on your bed, at a desk, or even standing. The aim is to support the head gently while allowing the neck muscles to relax and lengthen.
1. Stretch #1
- Place the middle of the strap at the base of your head.
- Hold both ends of the strap and extend your arms forward.
- Slowly move your head forward and back, similar to the gentle sliding motion seen in Egyptian dance.
- Keep your shoulders relaxed to avoid straining the arms.
- Continue this movement for one to two minutes.
2. Stretch #2
- Continue for one to two minutes, then repeat on the opposite side.
- Place the centre of the strap on the right side of your head, just above the ear.
- Bend your left arm at a right angle and hold the strap.
- Move your left forearm up and down to guide the head into a gentle sideways stretch.
Conclusion
Yoga straps offer support in many different ways and can be used in both simple stretches and advanced poses. Before practising with a strap, it is helpful to learn the correct way to loop and place it from a qualified instructor. This ensures you use it safely and receive the full benefit of the stretch.
You can use a strap to support your posture, refine alignment, deepen or soften a stretch, or focus on a specific area of the body. With several types available, choose the one that suits your comfort and practice style.
Regular use of a yoga strap helps ease tension in the muscles, improves flexibility, and leaves the body feeling relaxed and open.
.
Frequently asked questions on yoga strap
In a D-ring strap, take the empty end through both loops and then fold it over itself. This empty end will now be on top of the rings. You should now take this non-ringed end through one D-ring to tighten the loop.
A cinch buckle has a divider which creates 3 sections/slots. Take the empty end of the yoga strap thread it from the inner section. Bringing the strap end over the divider, push the empty end into the outer section. You can loosen or tighten the loop using the empty end that you have pushed into the various slots.
Typically, there are 3 variants available – 6-feet, 8-feet, or 10-feet. The 6-feet yoga trap can be used for all yoga asanas and is most preferred by beginners. However, if you are quite tall, you will need the 8-feet or 10-feet variant, depending on the availability.
Yoga straps often come in cotton material which makes them easily washable. Use cold soapy water to soak them or wash them in a washing machine. Instead of putting them in the dryer (to avoid shrinking), hang them to dry. Do not leave them to dry in a damp place or else they can get moldy.
The basic difference between the two is that a yoga strap is for support and can be adjusted. A resistance band, as the name suggests causes resistance to your movement, just like a rubber band.
Yoga straps are made from cotton material whereas resistance bands are made from stretchy rubber material which causes pushback.
Resistance bands can offer light to heavy resistance. In a yoga belt, you create a loop to adjust your pose or stretch and it provides no resistance at all.