

Dry brine turkey for the juiciest, most flavorful bird with golden, crispy skin. An easy, no-mess method I make every Thanksgiving.
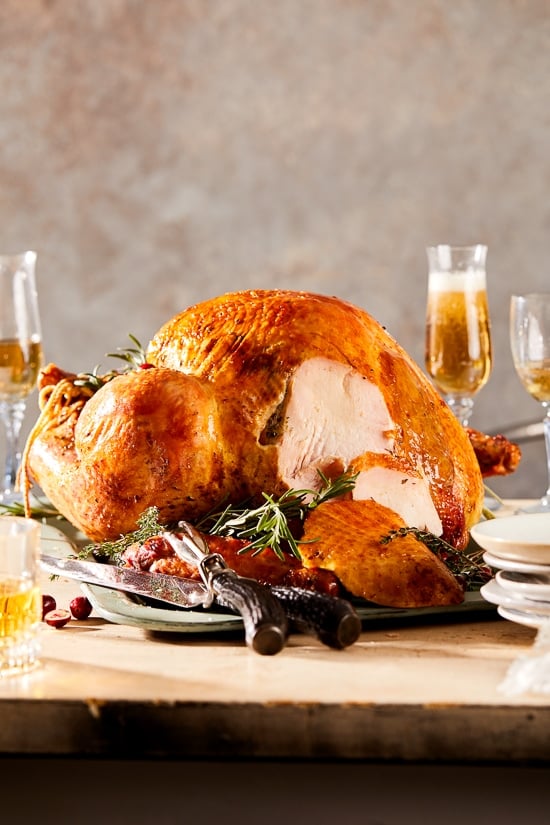
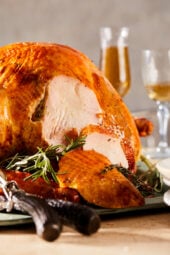
Herb and Salt-Rubbed Dry Brine Turkey
Looking for a foolproof way to roast a moist, flavorful turkey without the mess of a wet brine? A dry brine is the easiest, most reliable method I’ve tested over the years. Instead of submerging your bird in a big bucket of salty water, this method uses a simple mix of salt, herbs, and aromatics to season the turkey deeply and help the skin crisp beautifully in the oven.
I’ve been making my Thanksgiving turkey this way for the past few years, and it consistently comes out juicy, well-seasoned, and practically hands-off. The best part? You don’t need any special equipment—just time in the fridge. While a full 3 to 4 days gives you the best results, even starting a day late still works (I’ve done it myself!).
If you’re hosting a smaller gathering, you may prefer my stuffed turkey breast or slow cooker turkey breast, but if you want that classic whole-bird moment with zero stress… this dry brine turkey is the way to go.
Why Dry Brine A Turkey?

Dry brining is the easiest way to guarantee a moist, flavorful turkey with perfectly crisp skin—without the mess of a wet brine. After years of testing different methods, this is the one I come back to every Thanksgiving because it’s simple, reliable, and produces consistently juicy results.
Here’s why it works so well:
- Seasons the meat deeply: Salt draws out moisture, dissolves it, then pulls it back into the turkey, carrying all those flavors with it.
- Keeps the turkey juicy without the mess: No giant buckets of brine to spill in your fridge.
- No buckets, no spills, no hassle: You don’t need a giant pot, cooler, or gallons of water. A dry brine takes minutes to prep and lives right on a sheet pan in your fridge.
- Gives you crisp, golden skin: Because the turkey stays dry on the outside instead of soaking in liquid.
- Is almost entirely hands-off: A few minutes of prep and the fridge does the work.
- Has been tested year after year: I’ve made this turkey multiple years in a row, and the results are consistently reliable — even if you start a day late.
- Lighter: Most turkey recipes rely on tons of butter, but this version keeps things lighter without sacrificing flavor. The dry brine does the work, so the turkey still comes out incredibly juicy and delicious.

What is a dry brine?
A dry brine is an herb and salt rub applied directly to the turkey. This creates satiny leg meat and juicy, perfectly seasoned breast meat. Air-drying the turkey on the last day of the 4-day process will make the skin crisp when roasted.
Ingredients You Will Need
Just a few simple ingredients to make the easiest Thanksgiving turkey. See recipe card below for exact measurements.

- Whole turkey – Dry brining works best on a fresh or thawed turkey so the salt can penetrate the meat.
- Kosher salt – The key to juicy, well-seasoned meat; it draws moisture out, dissolves, and pulls flavor back in.
- Fresh herbs – I use fresh sage, rosemary and thyme to add classic Thanksgiving aroma without overpowering.
- Dried herbs – I also add dried oregano and marjoram for extra herby flavor.
- Olive oil – Helps the skin brown and crisp.
How To Dry Brine a Turkey (Step-by-Step)
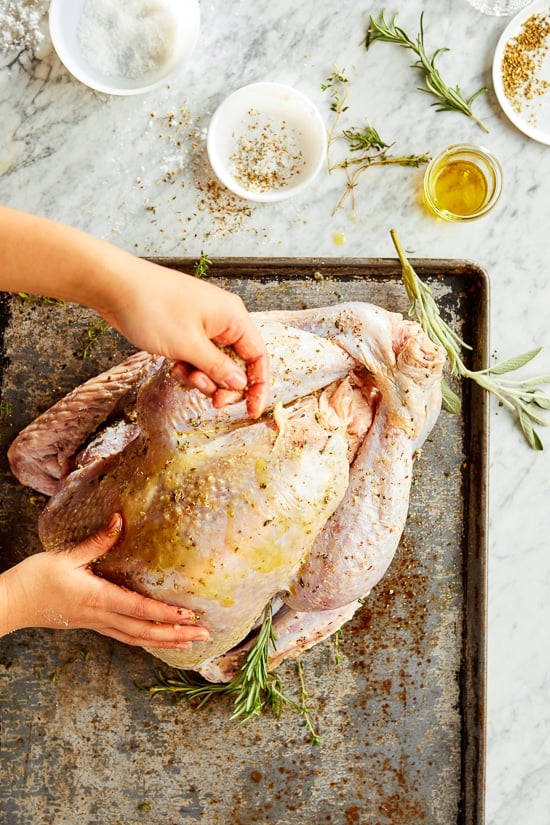
- Remove giblets + pat the turkey very dry. Dry skin = crispier roast.
- Loosen the skin. Gently slide your fingers under the skin of the breast (and thighs if you can) to loosen it without tearing. This helps the seasoning reach the meat and creates extra space for the skin to crisp.
- Mix your dry brine. Kosher salt, olive oil, and chopped herbs.
- Season the turkey generously. Sprinkle the dry brine mixture all over the turkey: over the skin, under the loosened skin on the breast, and inside the cavity. It doesn’t need to be perfect — the salt will distribute on its own as it draws moisture out and pulls flavor back in.
- Tuck the wings. Fold the wing tips underneath the turkey to prevent burning and help the bird roast more evenly.
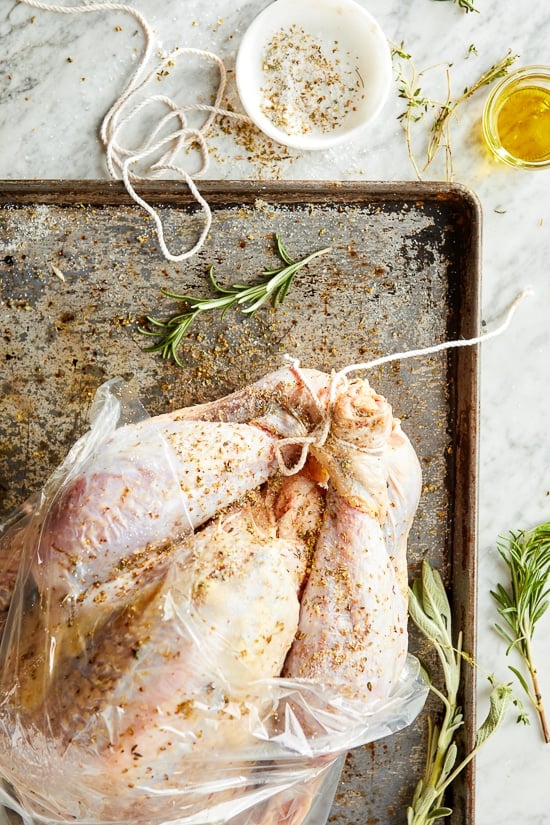
- Refrigerate in a bag for the first 3 days. Place the seasoned turkey in a large brining bag or oven bag and refrigerate, flipping every day. This keeps the fridge clean while the salt begins working its way into the meat.
- Uncover on day 4 for the crispiest skin. On the fourth day, remove the turkey from the bag, place it uncovered in a roasting pan or on a rimmed sheet pan, and refrigerate uncovered for the final 24 hours.
This step dries the skin so it roasts up beautifully golden and crisp. - Do NOT rinse. When ready to roast, do not rinse. Rinsing adds moisture back to the skin and can affect browning. Just pat dry if needed.
- Roast as directed. Roast until the breast reaches 160°F and the thighs reach 165°F (they’ll rise slightly as the turkey rests).
- Let it rest. Resting 20–30 minutes keeps the juices in the meat.


Choosing the right size Thanksgiving turkey
A good rule of thumb is to estimate at least 1 lb to 1 1/2 lbs per person so you’ll have extra and enough for leftovers.
Fresh or Frozen?
Whether you use a fresh or frozen turkey for dry-brining, start with a bird that has no seasoning in it at all. Avoid kosher turkeys, which have been pre-salted, as well as self-basting turkeys, which have been injected with a salt solution.
- Fresh – One of the pros of using a fresh bird is there’s no need to thaw. A fresh bird will keep for 4 days in the fridge. Some people think it’s more flavorful than a frozen bird.
- Frozen – Typically more affordable and can be purchased weeks in advance. It does however require thawing time. If the turkey is frozen solid when you buy it, it will need approximately 24 hours for every 5 pounds of turkey to thaw completely. For quicker thawing, place the turkey in a cold water bath and change the water every 30 minutes until it’s thawed.
Defrosting a Frozen Turkey
- Fridge – if you have more time, allow the turkey to thaw in the fridge in it’s original packaging. Allow 24 hours of thawing for every 5 lbs of bird.
- Cold Water Bath – If you’re short on time, submerge the bird in a cold water bath changing the water every 30 minutes. Allow 30 minutes of thawing time per pound of bird.
Variations
- Herb variation: Play around with different herb combinations.
- Citrus variation: Add orange zest to the dry brine for a brighter flavor.
- Butter: Add butter to the turkey just before roasting for a more decadent bird.
- Smaller gathering: Make my Stuffed Turkey Breast or Slow Cooker Turkey Breast instead.
- Want extra-crispy skin? Let the turkey sit uncovered in the fridge the final 24 hours.
How much salt should I use?
This recipe can be adapted to turkeys of all sizes. Use 1 tablespoon of salt for every 4 pounds. Diamond Crystal salt is best, Morton’s has more sodium and will be saltier. If using Morton’s, you will have to adjust and use less.
Kosher Salt
The only salt I cook with every day is Diamond Crystal kosher salt. Note that different brands and different types of salt vary not only in the amount of sodium per measured amount, but also for taste. When cooking the recipes from my website and cookbooks—both for flavor and for the sodium values listed—you should use Diamond Crystal kosher salt. If you use another type of salt or a different brand of kosher salt, just remember to taste as you go.
Storing Leftovers
- Refrigerator: Store leftover turkey in an airtight container for up to 4 days.
- Freezer: Turkey freezes well — portion into freezer-safe bags or containers and freeze for up to 3 months.
- Reheating: Reheat gently in the oven or microwave with a splash of broth to keep the meat from drying out.


Yield: servings
Serving Size: 6 oz turkey breast no skin
4-Day Dry Brine:
-
(4) Four days before you plan to roast the turkey, mix the herbs and oil in a small bowl. Remove the neck and giblets and reserve for stock, if using. Loosen the skin around the shoulders of the bird and around the cavity. Carefully slide your hands underneath the skin to loosen it from the breast, thighs, and drumsticks.
-
Combine olive oil and herbs. Rub the herbs on the meat, under the skin. Pat the skin back into place.
-
Rub the salt inside the cavity and on the skin. Tuck the wing tips behind the neck and tie the legs together with kitchen twine. Put the turkey in a large food-safe plastic bag (such as a turkey-size roasting bag) and tie. Put the bag inside a second bag and tie.
-
Day 1 to 3: Place on a rimmed baking sheet and refrigerate the turkey, turning it over every day, for 3 days.
-
Day 4: Remove the turkey from the bags and pat dry with paper towels. Transfer to a large roasting pan and refrigerate, unwrapped, to let the turkey air-dry overnight (for the fourth day).
Convection Roast Mode:
-
Position a rack in the bottom third of the oven and preheat the oven to 350°F in convection roast setting. If using a probe, insert the thermometer in the thickest part of the thigh not touching the bone and set the temp to 165F. Roast until the breast reaches 160°F and the thighs reach 165°F (they’ll rise slightly as the turkey rests), about 1 1/2 to 2 hours, or longer depending on the size of the turkey. Let the turkey rest for 30 minutes before carving to allow the juices to settle.
Conventional Oven:
-
Position a rack in the bottom third of the oven and preheat the oven to 425°F. Roast the turkey for 1 hour, then reduce the heat to 325°F.
-
Continue to roast until the breast reaches 160°F and the thighs reach 165°F (they’ll rise slightly as the turkey rests), about 1 3/4 to 2 hours, or longer for a larger bird. Let the turkey rest for 30 minutes before carving to allow the juices to settle.
Last Step:
Please leave a rating and comment letting us know how you liked this recipe! This helps our business to thrive and continue providing free, high-quality recipes for you.
- Brining Time: Dry brine the turkey for 3 to 4 days. Four days gives the best flavor and the crispiest skin, but even 3 days works beautifully.
- My Method: I keep the turkey in a bag for the first 3 days, then uncover it on day 4 to dry out the skin overnight before roasting.
- Do Not Rinse: Don’t rinse off the dry brine — rinsing adds moisture back to the skin and prevents browning. Just pat dry if needed.
- Salt Type: Use kosher salt only. Table salt is much finer and will make the turkey too salty. I use Diamond Crystal which has less sodium than Mortons.
- Starting Late: Even if you only have 24–48 hours, a shorter dry brine still improves flavor and texture.
Serving: 6 oz turkey breast no skin, Calories: 225 kcal, Protein: 45.5 g, Fat: 3.5 g, Saturated Fat: 1 g, Cholesterol: 121 mg, Sodium: 896.5 mg
FAQ
Ideally 3–4 days, but even 24–48 hours works. The longer it sits, the deeper the seasoning.
Yes! Even a 1–2 day brine improves flavor and moisture. I’ve started late myself and still had great results.
Only once thawed. The salt needs access to the meat.
No — rinsing adds water and prevents crispy skin. Just pat the turkey dry before roasting.
Yes. Aromatics like lemon, herbs, garlic, or onion add fragrance without affecting the brine.
No. The salt dissolves into the meat, seasoning it evenly without salty spots.
