If you find yourself struggling to organize your digital photo library, you are not alone. These days, it is so easy to take thousands of photos. The hard part is finding them when we want to print them out or share them with friends and family.
In this guide, I’m going to share with you some tips and tricks for getting on top of organizing your digital photo library. As a professional photographer, this is something I really have to keep on top of, as being able to find a specific photo from the hundreds of thousands I have taken over my career can be critical.
As an example, my wife Jess recently wanted me to find a couple of photos to print out to decorate our laundry room. As part of that, she asked me to share with her all the photos I’ve taken over the years of laundry hanging from lines in different locations around the world so she could choose her favorites.
This somewhat odd request triggered a question I’ve often thought about but never really answered comprehensively.
That question being, how do you organize your photos in a way such that when someone asks for photos of a specific subject, you can quickly and easily find all the photos that match that request? What is the easiest way to actually set up your photo library so you can retrieve the photos you want? Is it keywording? Good folder naming? Something else?
This might seem like it should be an easy question to answer, but even with a relatively well managed photo library, it can be fairly challenging to find the specific photos you want every time you search.
If you’ve ever found yourself staring at a large selection of images trying to find that specific one you took that time, or which match a set of criteria you have in mind, this post is going to help you. Or if you’d just rather not find yourself in that situation, well, I’ve got you covered.
In this guide, I’m going to look at how you can organize your photo library so that whatever set of photos you want, from whatever trip, date, or shoot, you can quickly and easily find them.
I’m going to share the various options for how to go about sorting and cataloging your photos to quickly and easily find this data, including both manual options and some rather nifty AI powered options.
First though, I’m going to cover my existing photo management approach, so you can see where I’m starting.
My Photo Management Approach
Personally, like many photographers, I use Adobe Lightroom for the majority of my image editing and image management requirements. I have a fairly large catalog of images from our many years of photography and travel. In fact, I currently have over half a million images in my photo library.
I definitely recommend everyone uses some form of photo management product to manage their photos. This doesn’t have to be Lightroom, in fact, I have a range of recommended alternatives to Lightroom you can check out. The key thing is that you have some way to organize, sort and find your images.
With so many images in my library, I obviously need some sort of organizational process in place. Because most of the photos I take are related to potential content on our two blogs, which are normally destination specific, that’s how I organize my images. Each trip gets its own folder on my hard drive, and an accompanying folder in Lightroom.
I then use Lightroom’s Collections feature to create collections around specific topics, such as public transport in London. I also use Lightroom’s labelling and rating systems to identify the photos from each shoot that I regard as being good enough for publication.
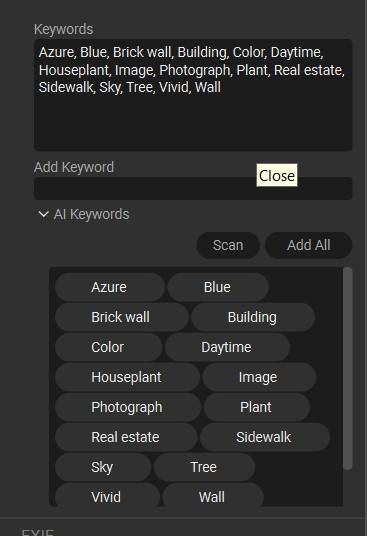
The one area of Lightroom I have not been great at using is keywording. I do occasionally use the feature to keyword images, but I am certainly not consistent in using it. This is definitely an oversight, and can make searching for images a lot more challenging.

Now, I recommend not being like me and spending more time adding keywords after uploading your photos. In my defense, when I return from a trip with thousands of images to review, the thought of going through and assigning keywords to them manually seems like a huge time investment without a big upside.
The downside to this, is that when I’m asked for a specific set of images that don’t necessarily line up with my existing strategy for organizing my photos, it can end up being hugely time consuming to manually go through my whole photo library trying to find photos that meet the requirements.
So when asked to find photos of something that isn’t going to be trip or date specific, such as finding photos of hanging laundry which is what sparked this article, this can be challenging as it’s not the type of photo I would normally add a keyword to. The same might be if looking for photos of doorways, cats, fruit trees, people wearing a backpack, people drinking coffee, photos taken from airplane windows, etc.
So that means if I want to find those photos, and I haven’t keyworded them properly (spoiler, I am not great at keywording), then I have to try to recall where I might have taken a specific type of photo, and scroll through a library of hundreds of thousands of images to find images that match.
Even when I could narrow it down to a certain destination, say Barcelona, I’d then be dismayed to find we’ve been to Barcelona 4 different times in the past 10 years, and taken thousands of photos each time.
Looking through tens of thousands of photos is not a great use of my time, so I set out to find a better way and share it with you.
Photo Organization Options
There are a few different ways you can organize your photos which I will now go through. The options vary between being basically entirely manual, through to more advanced tools that do some (or all!) of the work for you.
Manual Keywording
Perhaps the easiest, but most time-consuming option, for organizing your photos for easy retrieval at a later date is to add keywords to the image metadata.
In case you are wondering what that actually means, here’s an explanation. In photography, metadata is information about an image. That could be anything from the camera and lens settings when the image was taken, through to GPS location data, date and time of capture, image ratings and more.
Metadata can be used to store all kinds of data about the image, including keywords that can be used to describe the image itself.
Depending on the image file type, some or all of the metadata is stored inside the actual image file itself. In some instances though, specific metadata cannot be stored inside the actual image file, and so is stored either in a separate database (such as a Lightroom catalog), or in a small file alongside the image (usually an XMP file).
When you open up an image in a tool like Lightroom (or one of the many Lightroom alternatives), this metadata becomes available so you can search for and find images with specific metadata.
So, for example, you can find all images taken at a certain time of day, or at a certain ISO, or with a specific lens and camera combination. The possibilities are pretty endless.
Keywords are just another bit of metadata that can be associated with an image. A keyword is normally a descriptive word or sequence of words which describes the content of the image. They can be anything you like, just bear in mind that they are going to be for you to use for searching at a later date. So, you will want to use fairly obvious keywords.
Examples of keywords might be things like “flower”, “dog”, “animal”, “laundry”, “museum”, “landscape”. A photo can have multiple keywords, and keywords can be single words or multiple words.
I’d recommend against keywords that replicate existing information. For example, if you go on a trip in April 2023, you might think to keyword with “April 2023 Trip”. However, as date and time information is already embedded into an images metadata, this would just be redundant.
Keywording your images manually is very easy, and pretty much every photo management tool on the market has a way to add keywords. This also means it doesn’t cost you anything extra.
In Lightroom, you’ll find the keywording tool in the library module. Just load up any image and the keyword metadata is available on the right-hand side of the screen. All you have to do is type in your keywords. Lightroom will also suggest keywords.
The advantage of manually keywording your images is that you have total control over the keywords you use for each image. It is also easy to do and it is usually free to do with whatever photography software you already use.
The disadvantage of manually keywording your images is that it can be very time consuming, especially if you take a lot of photos. So while it is a good idea in theory, in practice many photographers (myself included) either skip it entirely or do very minimal keywording.
Automated Keywording using On1 Photo Keyword AI
If the thought of adding keywords to all your images seems overwhelming, I have good news. Technology has a solution to help you out! The first solution I’m going to talk about is an automated keywording tool.
There are a few options on the market, and I’m going to cover what I think is one of the better options out there, On1 Photo Keyword AI.
On1 Photo Keyword AI is a standalone keywording product from On1 Photo, who also make one of my favorite alternatives to Lightroom, On1 Photo RAW.
Keyword AI is included as part of the latest versions of On1 Photo RAW, so if you were already looking for a photo editor and photo management tool, I’d suggest picking that product up as it includes some great additional tools at a very reasonable one-off price.
The process for using Keyword AI in On1 Photo RAW is pretty much exactly the same as using the standalone Keyword AI product, and you can also set it up so that it automatically scans for keywords when you add images to your catalog.
However, if you already have a photo management and editing tool you like, and are just looking to improve your keyword management, On1 Photo Keyword AI is the product to use.
The tool is straightforward to use, whether you are using it standalone or as part of On1 Photo RAW.
For the standalone version, simply open an image in On1 Keyword AI, then from the right-hand panel under “AI Keywords”, select “scan”.
Of course, you can batch process images using the tool rather than doing them one at a time, but for these examples I’m just going to go through individual images to give you an idea of what is (and isn’t!) possible. I’ll start with this image of a waterfall from a recent trip to Wales.
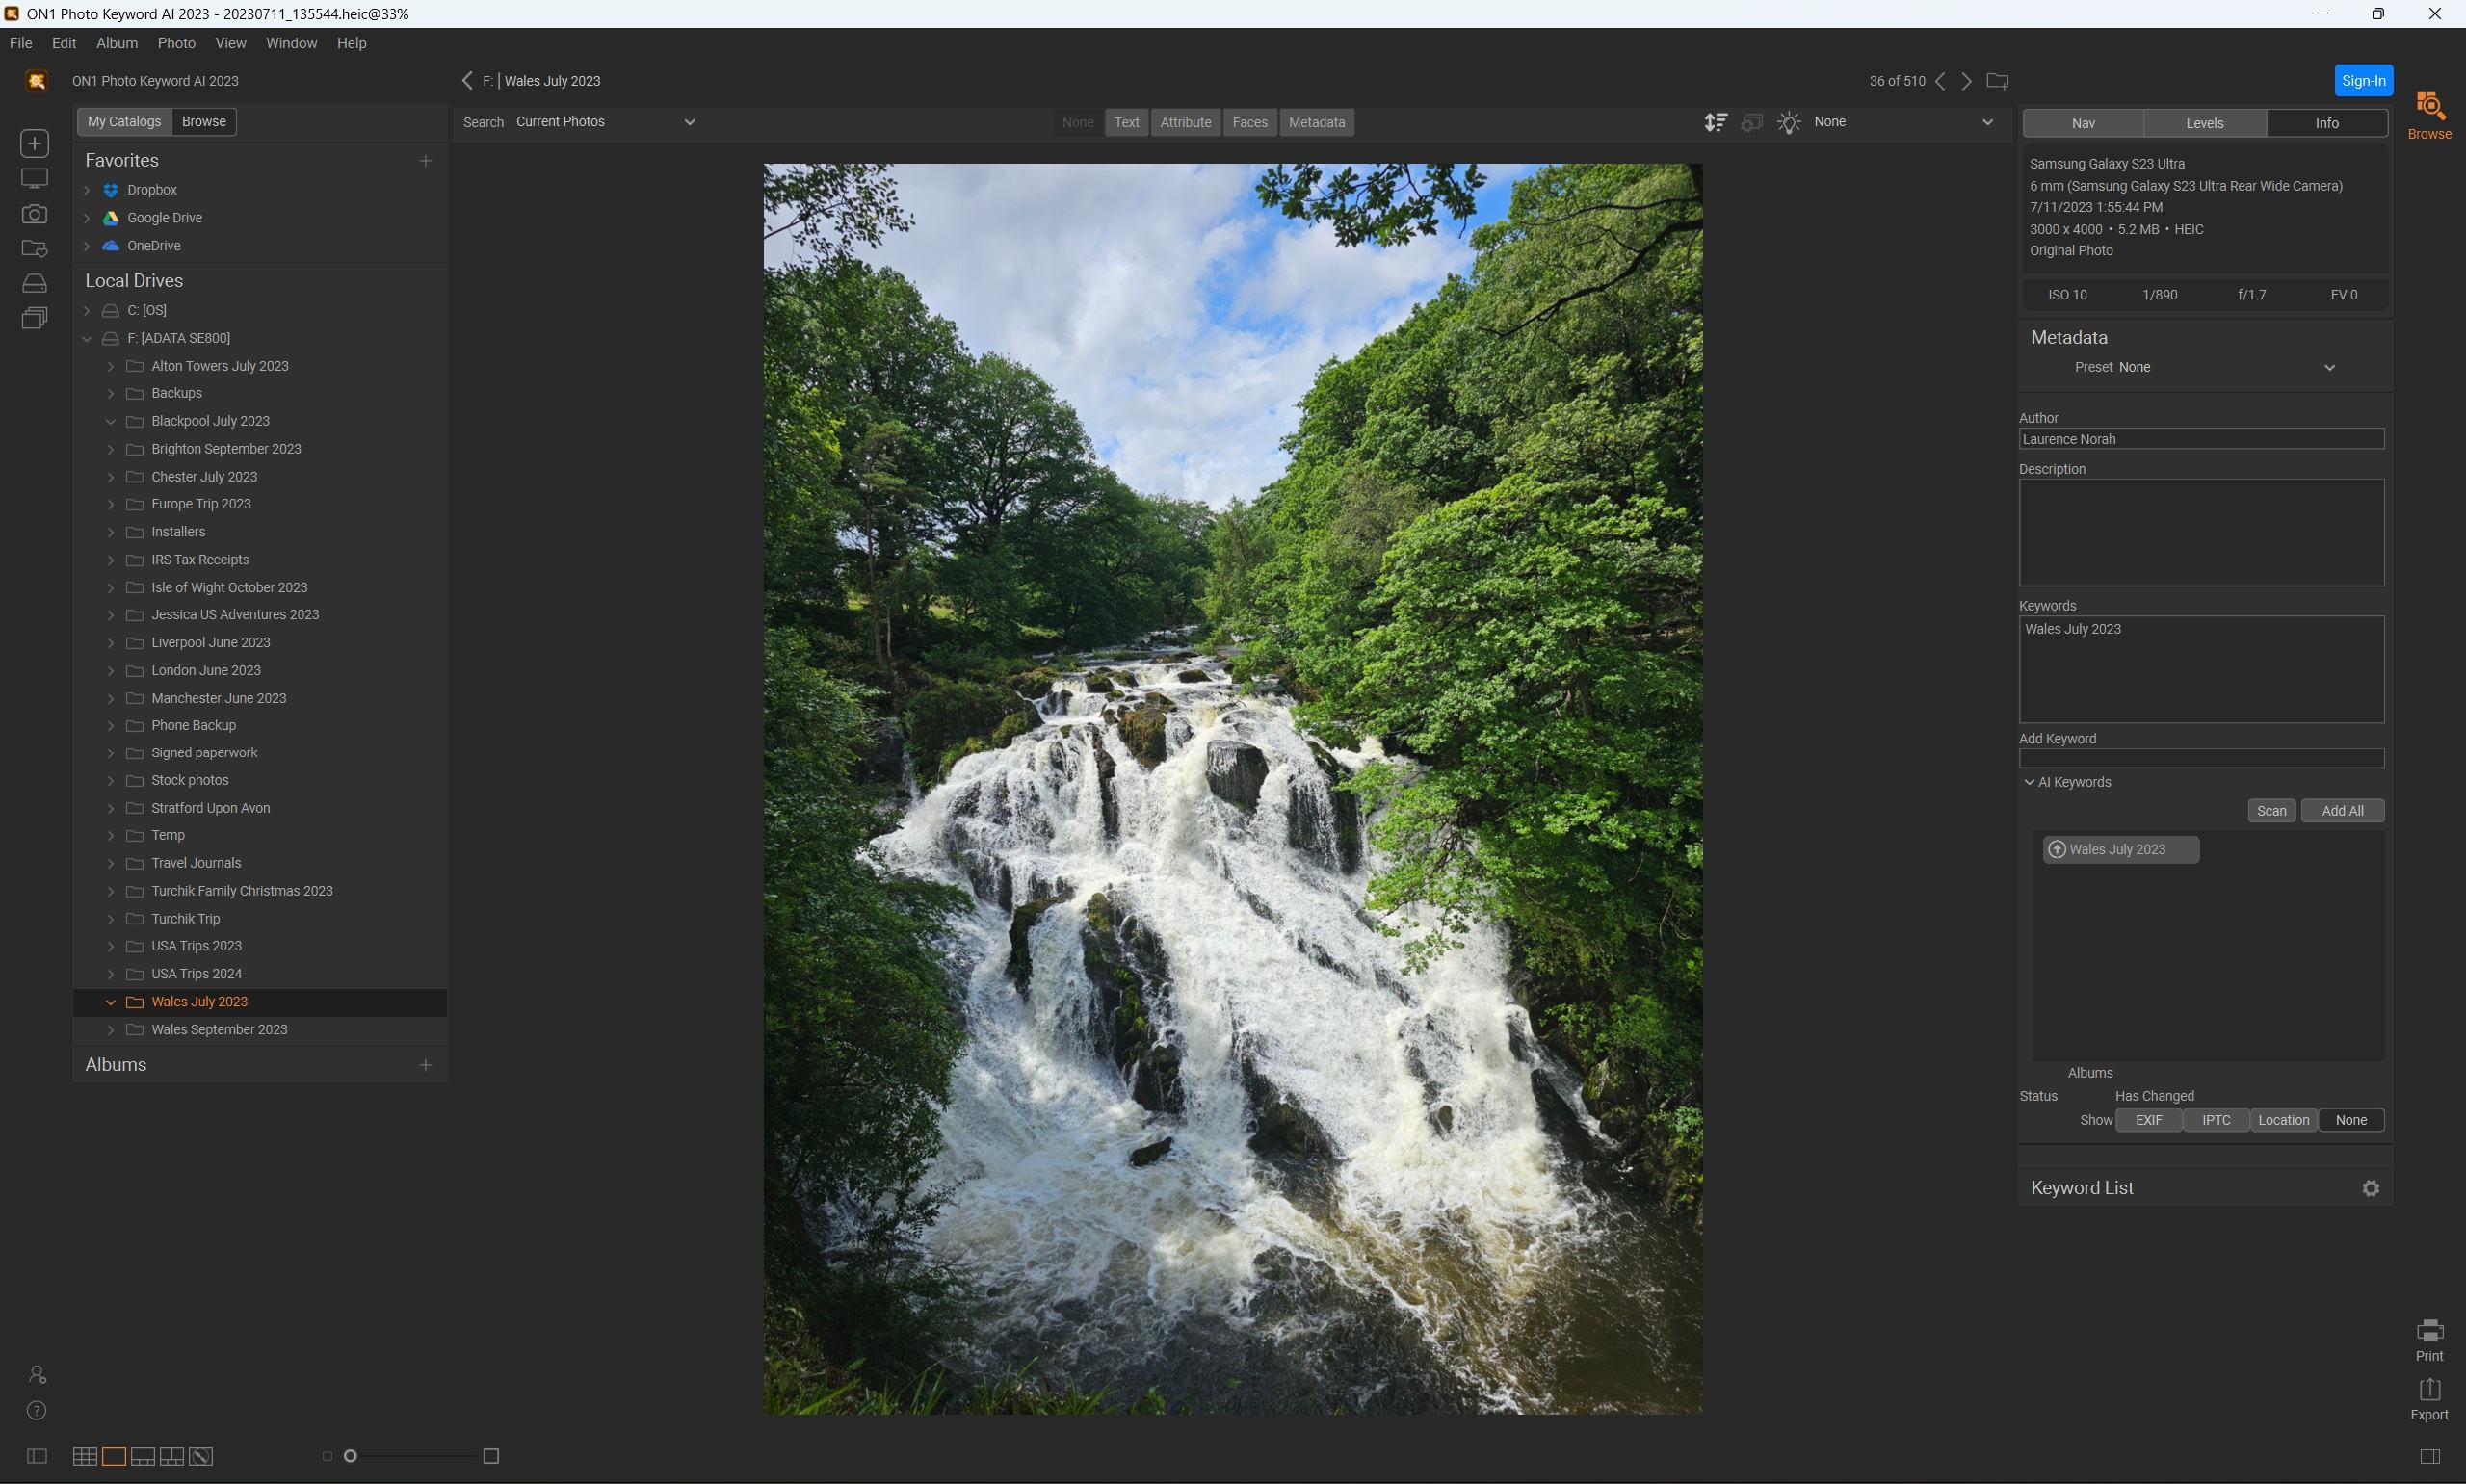
Once you have scanned an image with Keyword AI, it will provide some suggested keywords based on its analysis of the image You can then populate the keywords of that images metadata with some or all of those images.
With the above image of a waterfall in Wales, I got the following result:
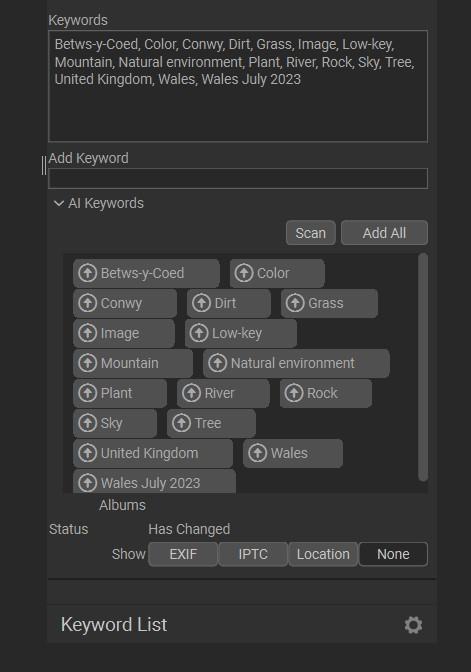
As you can see, the majority of the main themes of the image have been captured, including the river, sky, rock and tree elements. The main omission is that this is an image of a waterfall, which wasn’t picked up on.
Let’s try another example.
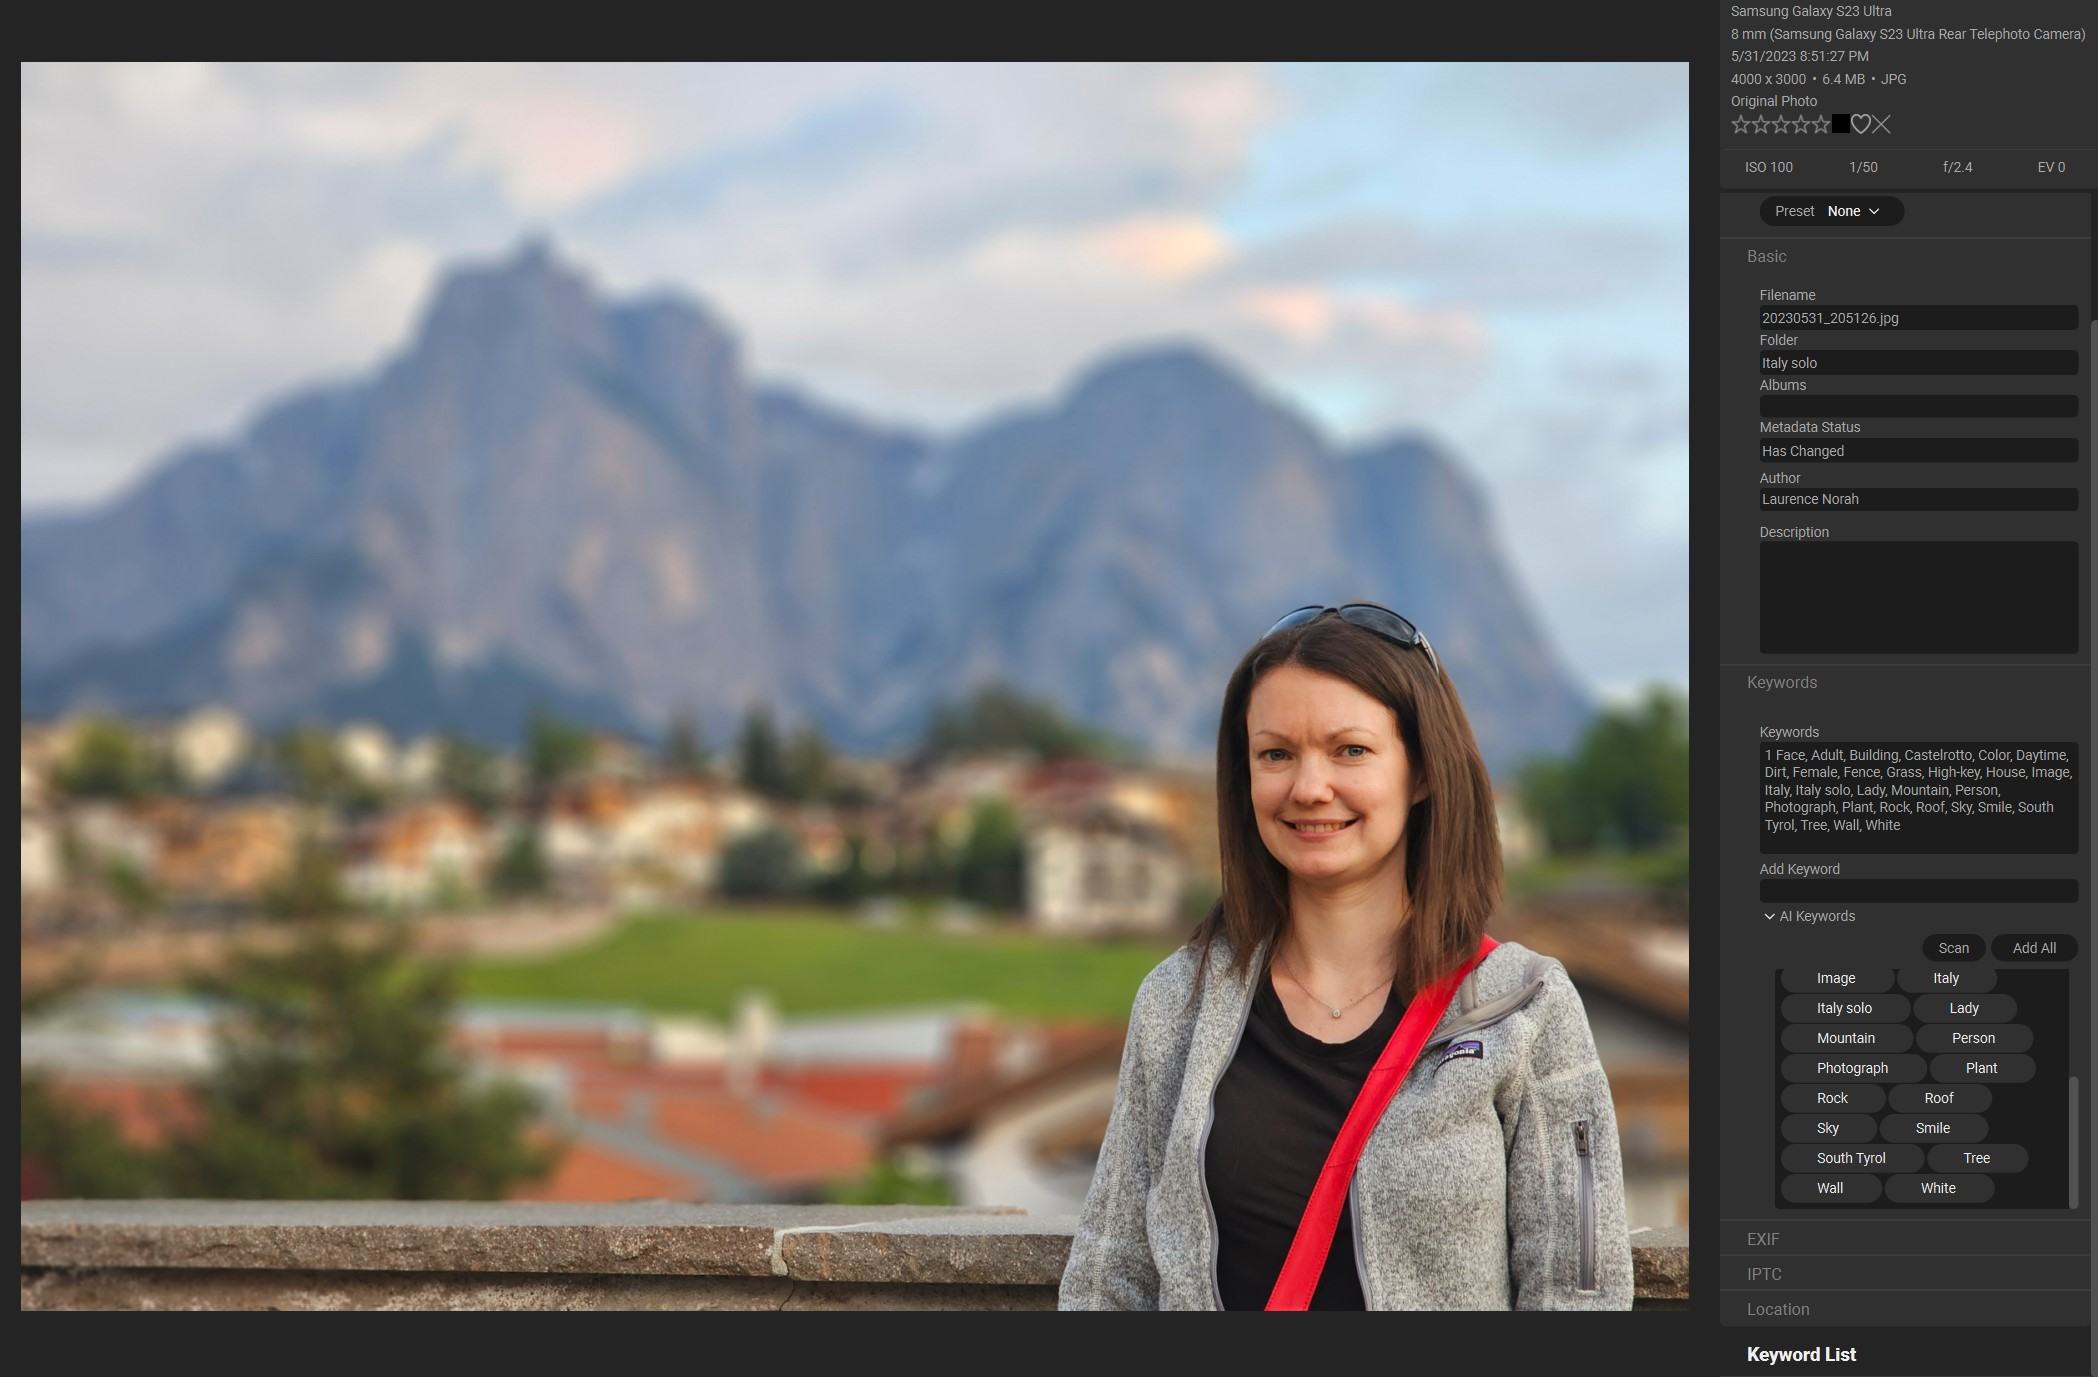
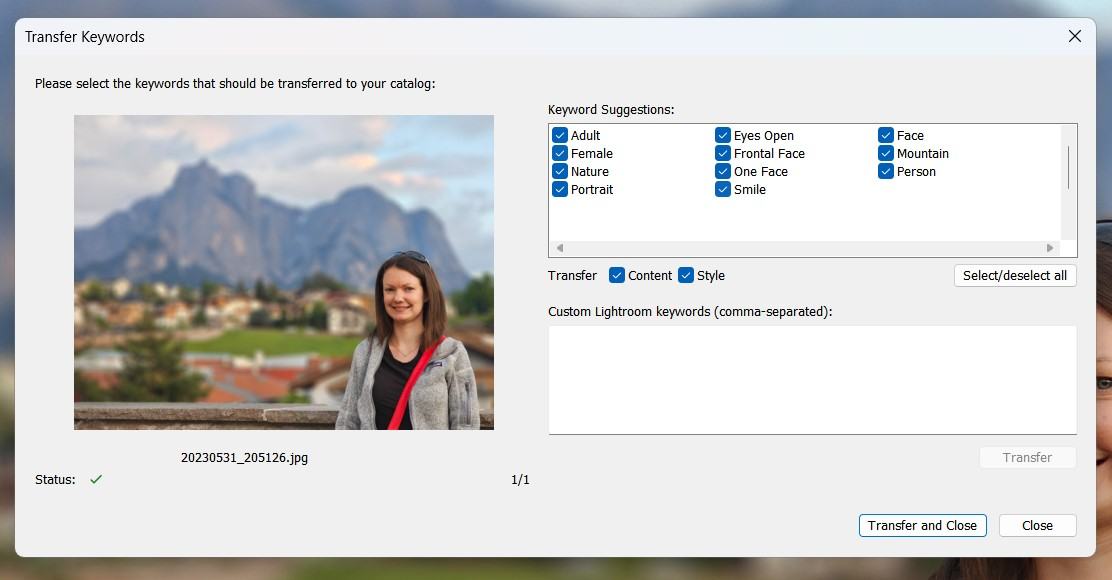
This shot of Jess in Italy has a number of different elements. Let’s see what On1 Keyword AI has to say about them.
As you can see, it has picked up the key themes, a smiling female person, a mountain, the fact that there are trees, houses, rocks and sky, that it’s taken in the daytime and so on.
This would make searching for an image of Jess against a mountain backdrop where she is smiling much easier in the future.
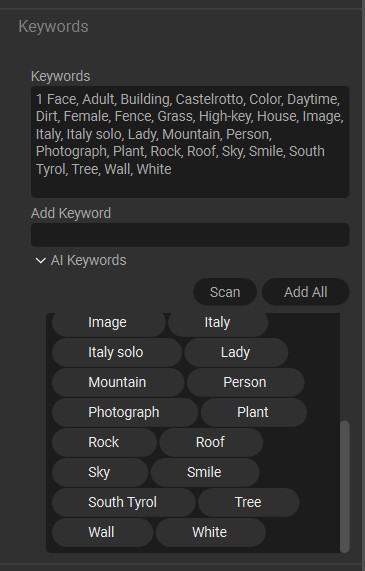
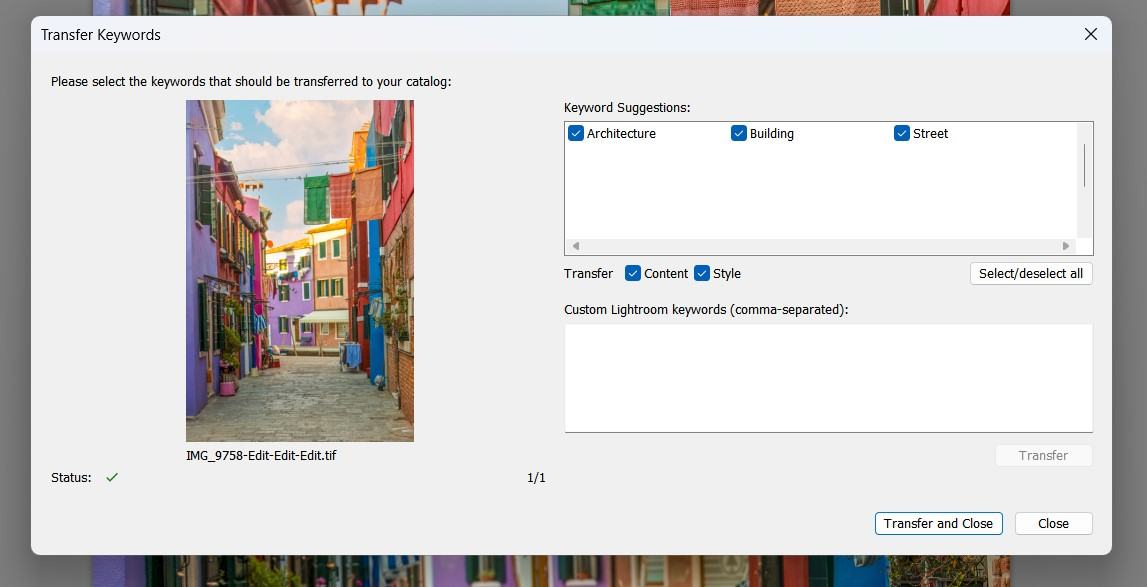
Finally, let’s look at the sort of image that triggered this whole process in the first place, some laundry hanging on a street in Italy.
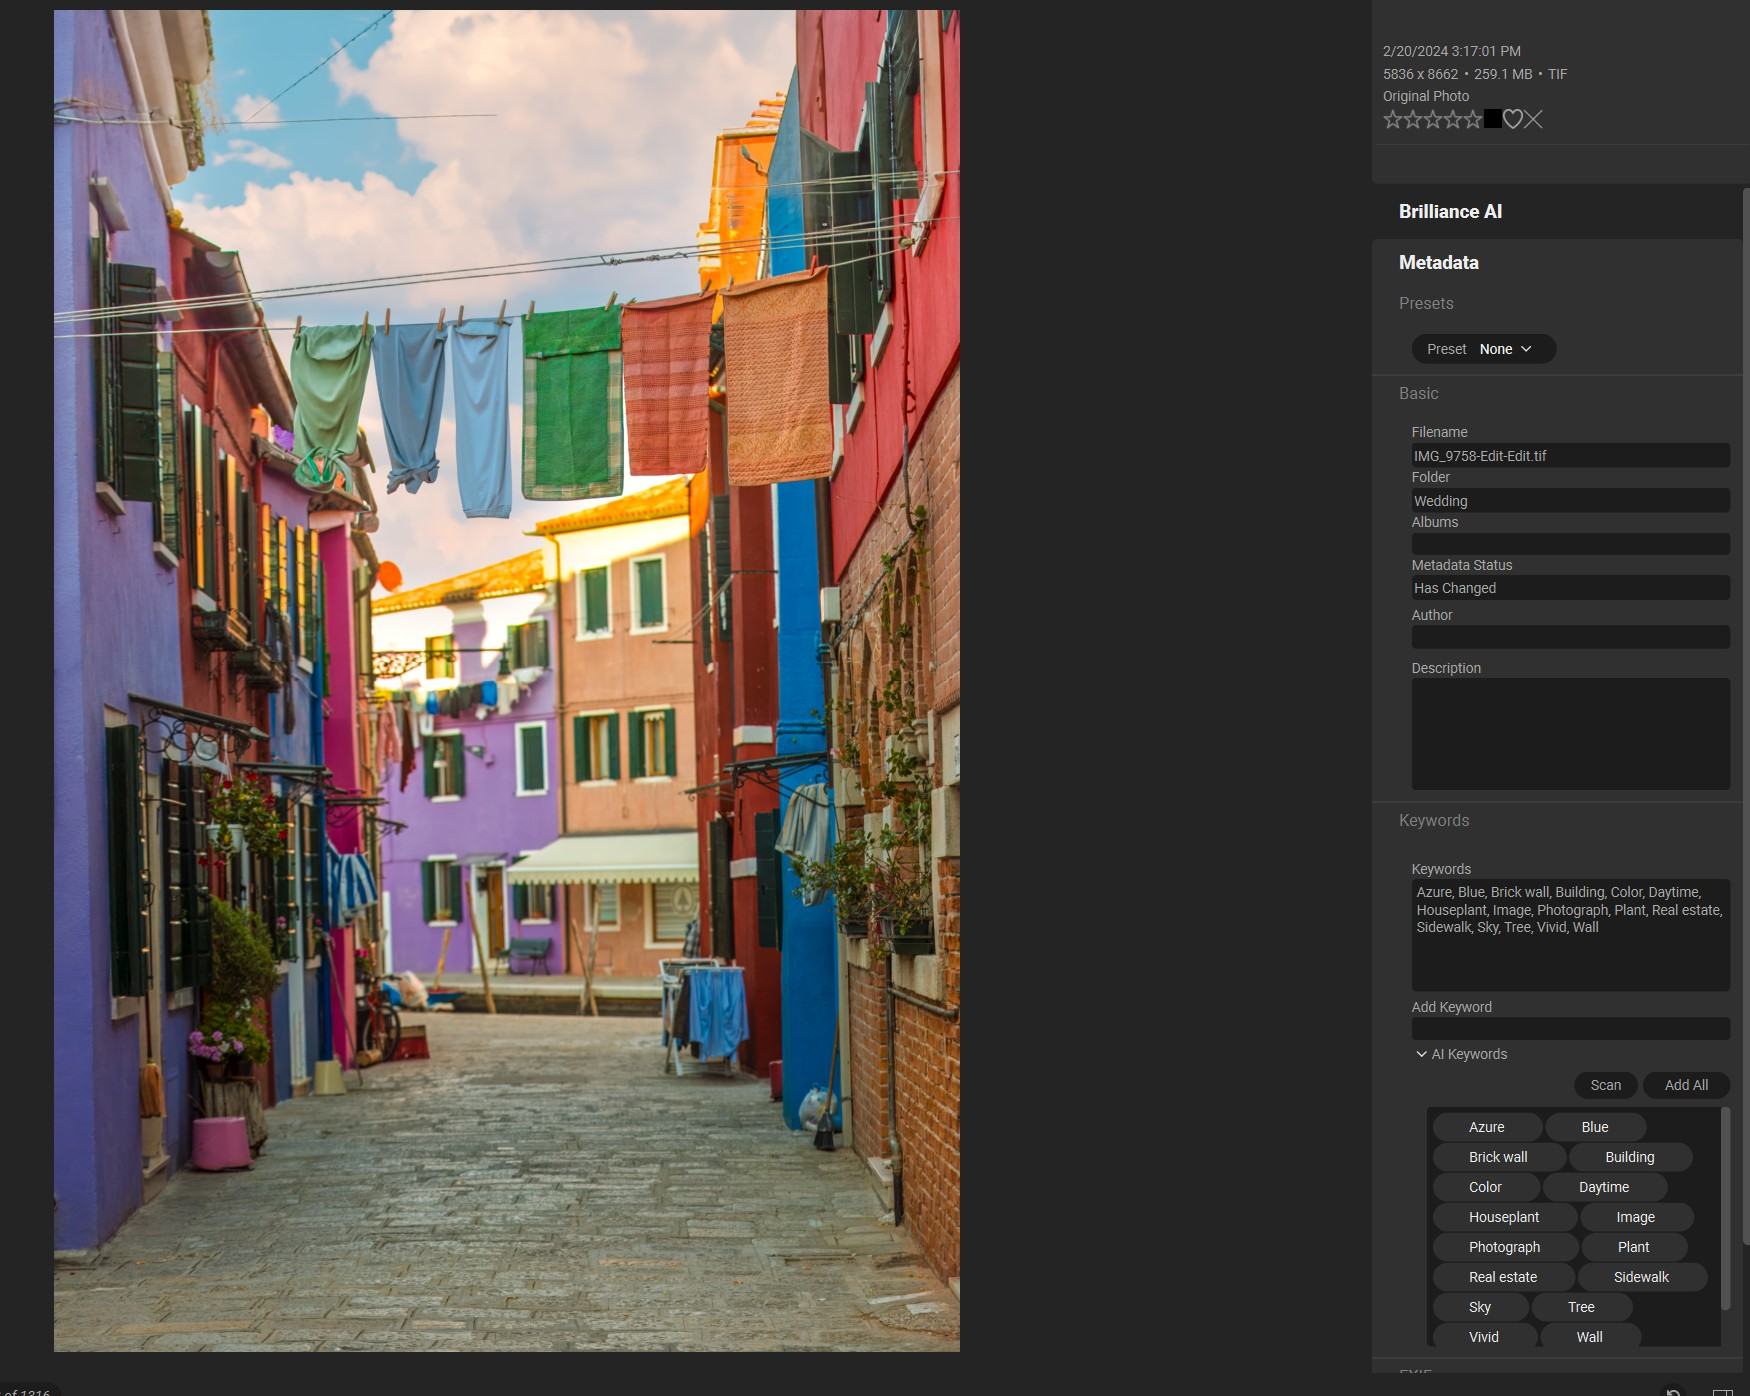
Here are the keywords that On1 Keyword AI picked up on with this image.
As you can see, many of the themes of the image are correct, with plants, buildings and the vivid colors picked up on. Unfortunately, this tool didn’t pick up on the hanging laundry aspect.
Overall, the On1 Keyword AI tool is quite helpful in speeding up the keywording process. It is also relatively inexpensive, although I would probably suggest just springing for the full On1 Photo RAW product as then you also get a bunch of other tools like noise reduction, sky replacement and of course a full photo editing and management suite.
If you just want an inexpensive and fairly effective photo keywording tool it’s definitely a good option. There’s also a free trial available for both Keyword AI and On1 Photo RAW, which you can download on the official website here.
However, there is another option to consider which you might prefer, depending on your needs.
AI Based Image Management: Excire Search / Excire Foto
Another more comprehensive type of tool you can use for organizing, keywording, and finding your photos is an AI based image management tool like Excire.
This offers the same type of AI keywording features that the above On1 Keyword AI tool above has, but it also comes with a lot more features to help you organize and find photos. These include the abilities to search for images by a text prompt, by faces, by people, by example images, etc. More on these shortly.
There are two versions of the Excire product, Excire Search and Excire Foto. These are similar, but one (Excire Search) is designed to work within Lightroom, whilst the other (Excire Foto) is a standalone product which works outside of Lightroom.
As I use Lightroom I use the Excire Search product, which is what I’ll be referencing in this guide. However, the features and capabilities are similar, so I’d suggest evaluating whichever version works best for your workflow.
Like On1’s Keyword AI tool, the Excire products offer the ability to automatically analyze your images and update their keywords. However, their tools are a lot more advanced than that. Let’s dive in and see what they have to offer.
When you load up Excire Search for the first time, it will request to scan all the images you want it to include in its search results.
You can do this for a folder of images, or all the images in your library, depending on where you want to start. Personally, I had it scan my whole image library. This process did take several hours because I have hundreds of thousands of images, but it can be paused and resumed if required.
As part of the initial scan process I was able to ask Excire to add keyword data to my images as it went. You can also do this on a per image or per selection basis as well.
First, we’ll look at the keyword results that Excire Search came up with for the same three images I used with On1 Keyword AI, so we can do a direct comparison of the keywording features.
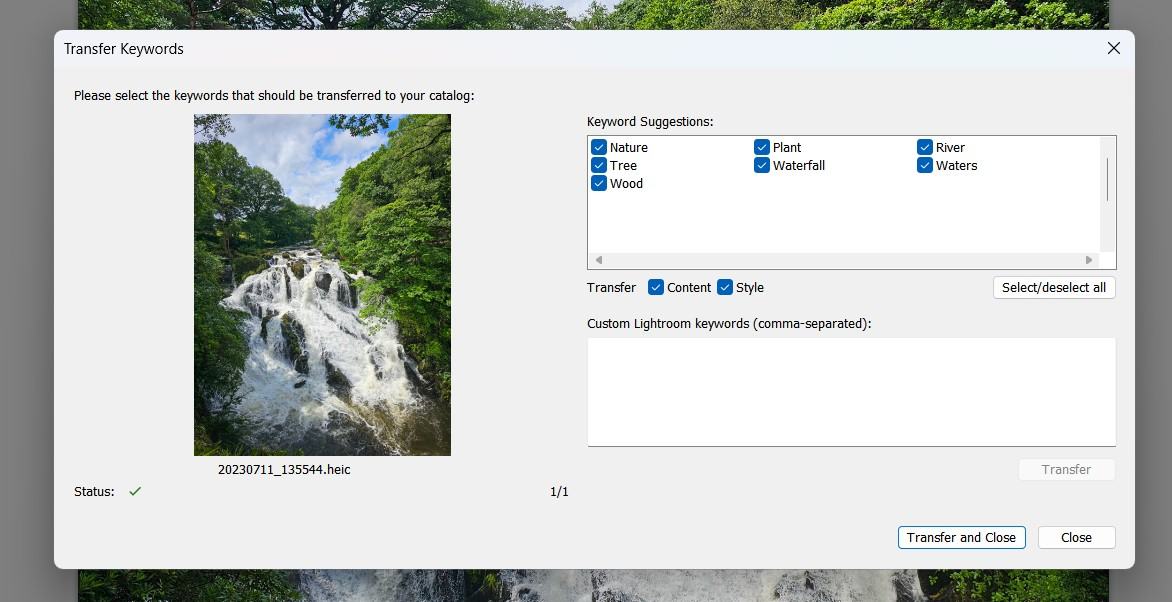
With the first image of the waterfall in Wales, you can see that the main keywords are spot on. Importantly, it also included the “waterfall” keyword, which I think is an essential one. There also isn’t too much extraneous information, but enough to be useful.
For the second image, again, the key themes are here without any extraneous information. Certainly, enough that a future search for images of a woman in front of a mountain would find it.
Finally, for the third image, I think that Excire perhaps went a little too light with the keywords here. None of them are wrong, but I had hoped for a little more. And again, as with On1, “laundry” or “clothes” is missing entirely.
So what do I think in terms of comparison between Excire and On1 for keyword suggestions? Well, I think Excire provides a more focused group of keywords for each image, whereas the On1 results are broader.
I wouldn’t say one is necessarily better than the other, but if you were just using keywords for search, the more focused results of Excire might give more accurate results, at the expense of less choice.
As previously mentioned however, the Excire tools go well beyond keywording for image organization, and the advanced features are really where the strength of this product is.
Once your image library has been indexed by Excire, you can search it as follows:
- By example image: open an image in Lightroom, and Excire will look for images that are similar
- By face: you can search images for faces that match a specific requirement, including the age, number of faces in the image, gender and whether they are smiling or not
- By person: if you select an image with a person, you can then search for other images featuring that person. You can also specify other requirements, including whether or not they are smiling, if they are on their own or with other people, and if their eyes are open or closed
- By aesthetic score: Excire assigns an “aesthetic” value to each photo in your library, with higher values being more pleasing according to the AI. So you can search for images with a higher aesthetic value if you want to see some of your better images (according to the AI anyway!)
- By text prompt: perhaps the most impressive search feature is the ability to search your image library by text prompt. Just enter any text, and the AI will look for images in your library that meet your requirements. So if you want images of hanging laundry, you could put “laundry hanging on a line”. You can also specify how loose or strict the engine needs to be. This actually feels pretty close to magic when you first use it.
For each search option, you can choose how many results to return (the default is normally 100), and if you want to search the whole catalog or the current image selection. You can also combine searches by choosing to search within the results, making for a very powerful overall system.
The text prompt search is definitely my favorite feature, and one that has personally made managing and finding my photos a whole lot easier since I started using it.
To go back to my original laundry example, here’s an image showing the first set of image results Excire found when I searched my entire Lightroom image catalog for the text “laundry hanging on a line”.
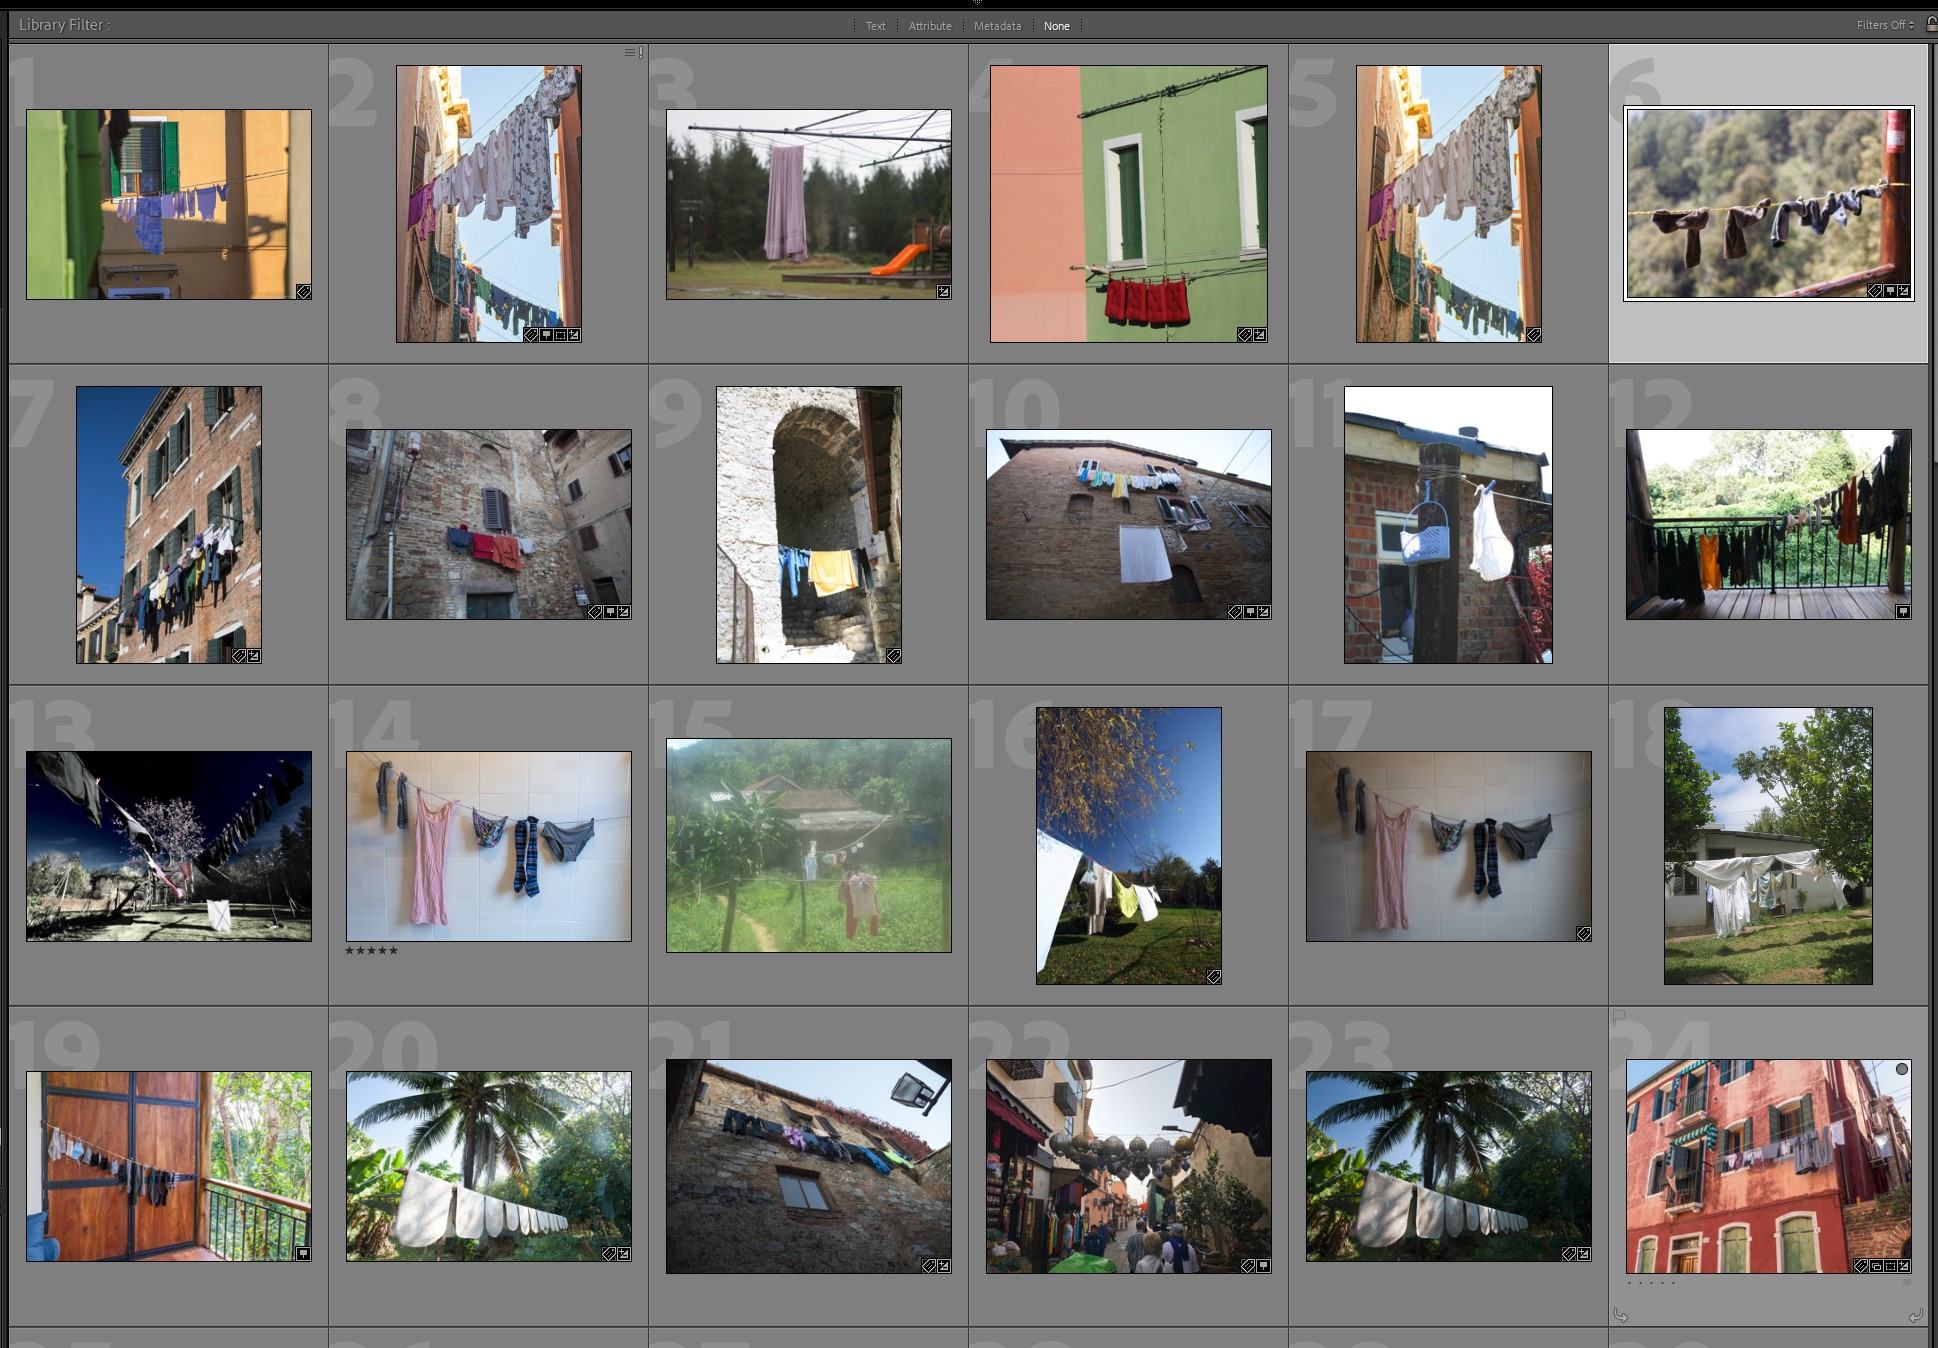
I think we can agree that is a pretty impressive result, which certainly makes my life as a photographer a lot easier when trying to organize and find photos along a specific theme.
Let’s look at another result for “person standing in front of waterfall”.
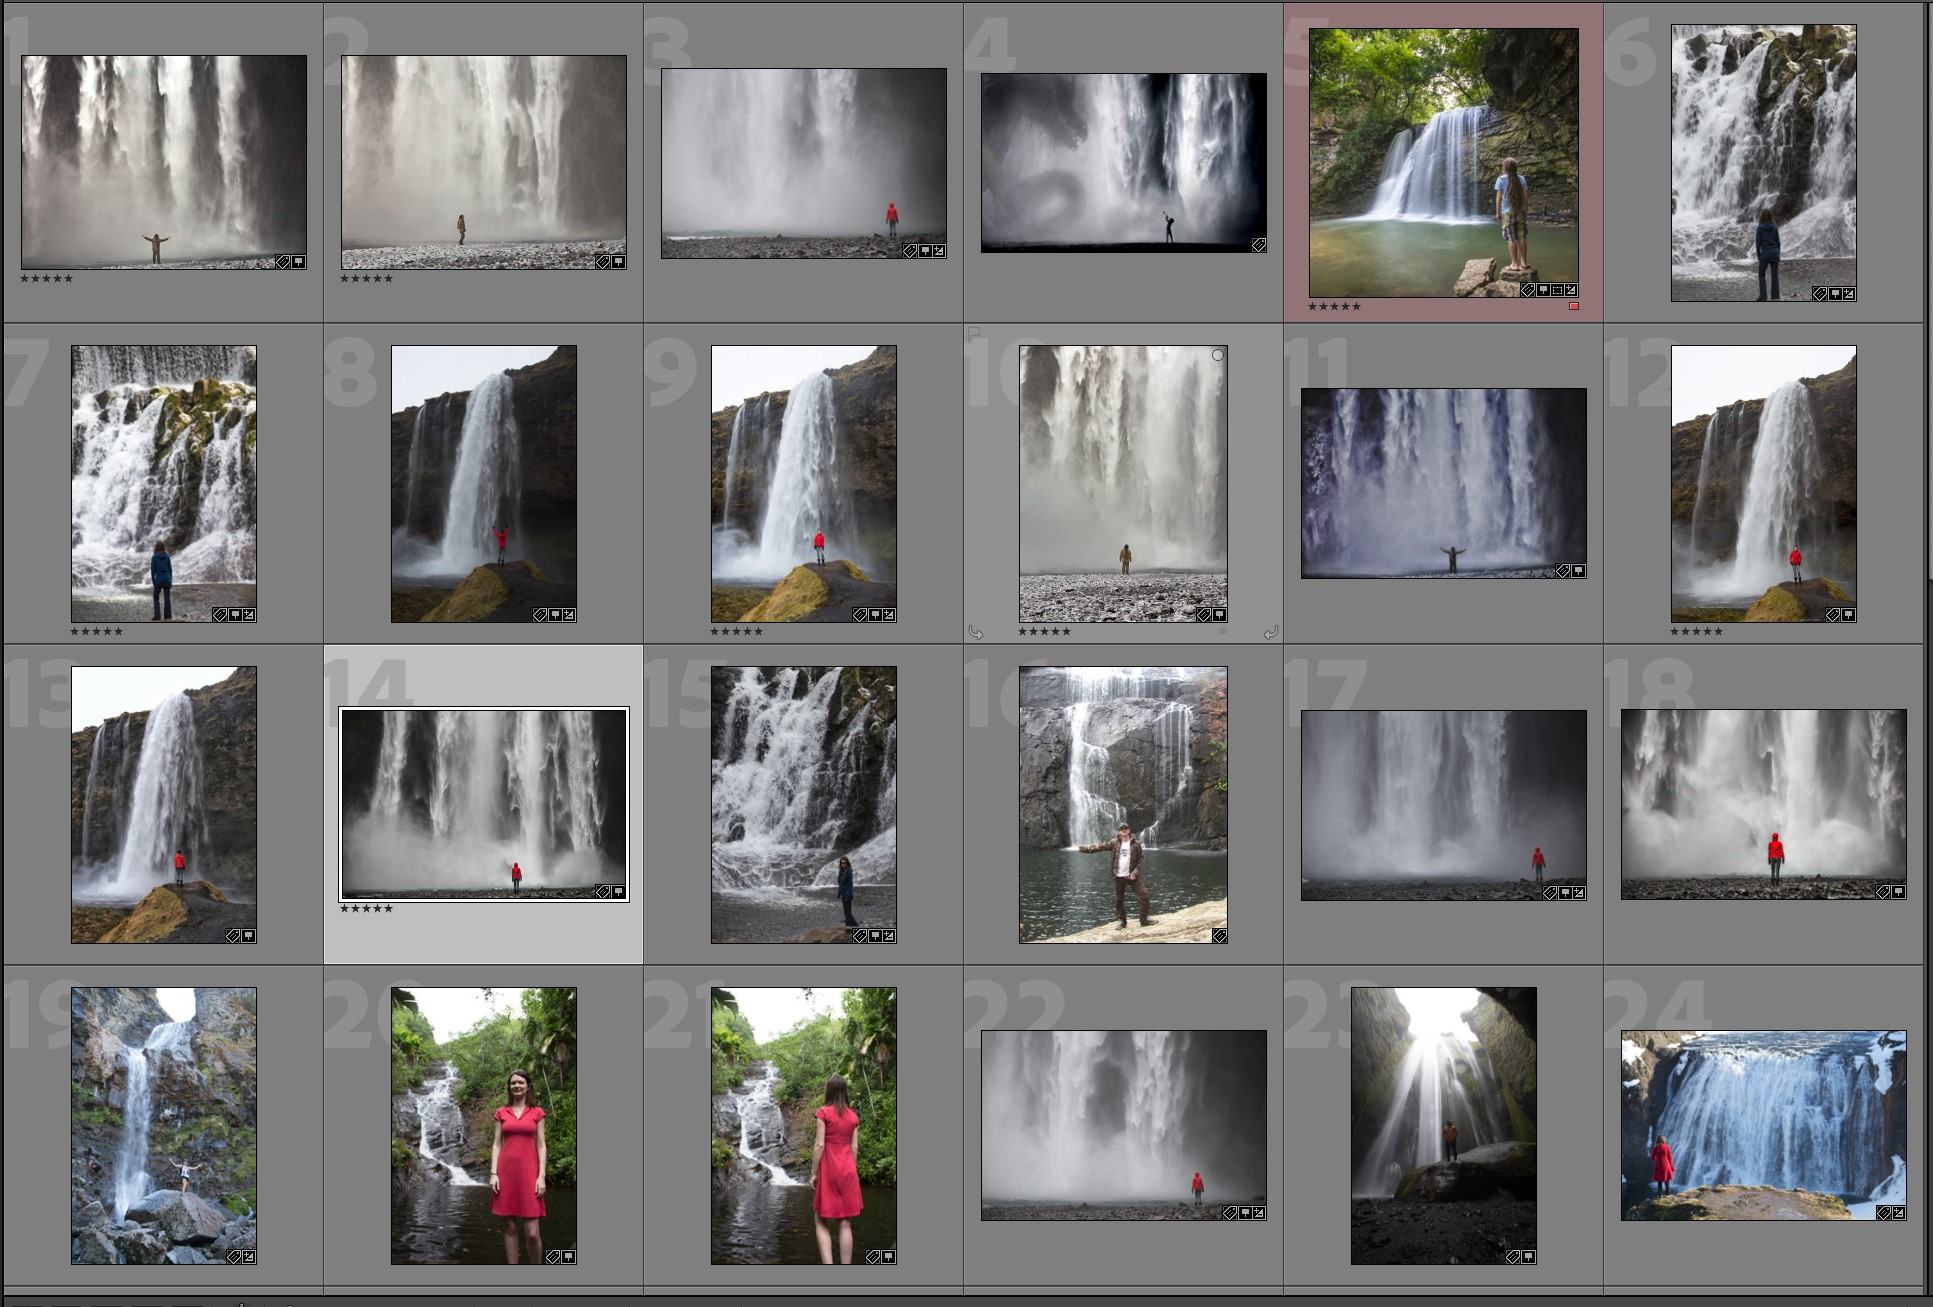
I think you would agree the results are pretty impressive. On my photo editing laptop, they only take a few seconds to appear as well.
Finally, one more example. I said earlier on in this guide that I like to take pictures of doorways on my travels. So here’s a set of results using Excire for the term “doorway”, which I then refined by those Excire felt to have the highest aesthetic value.
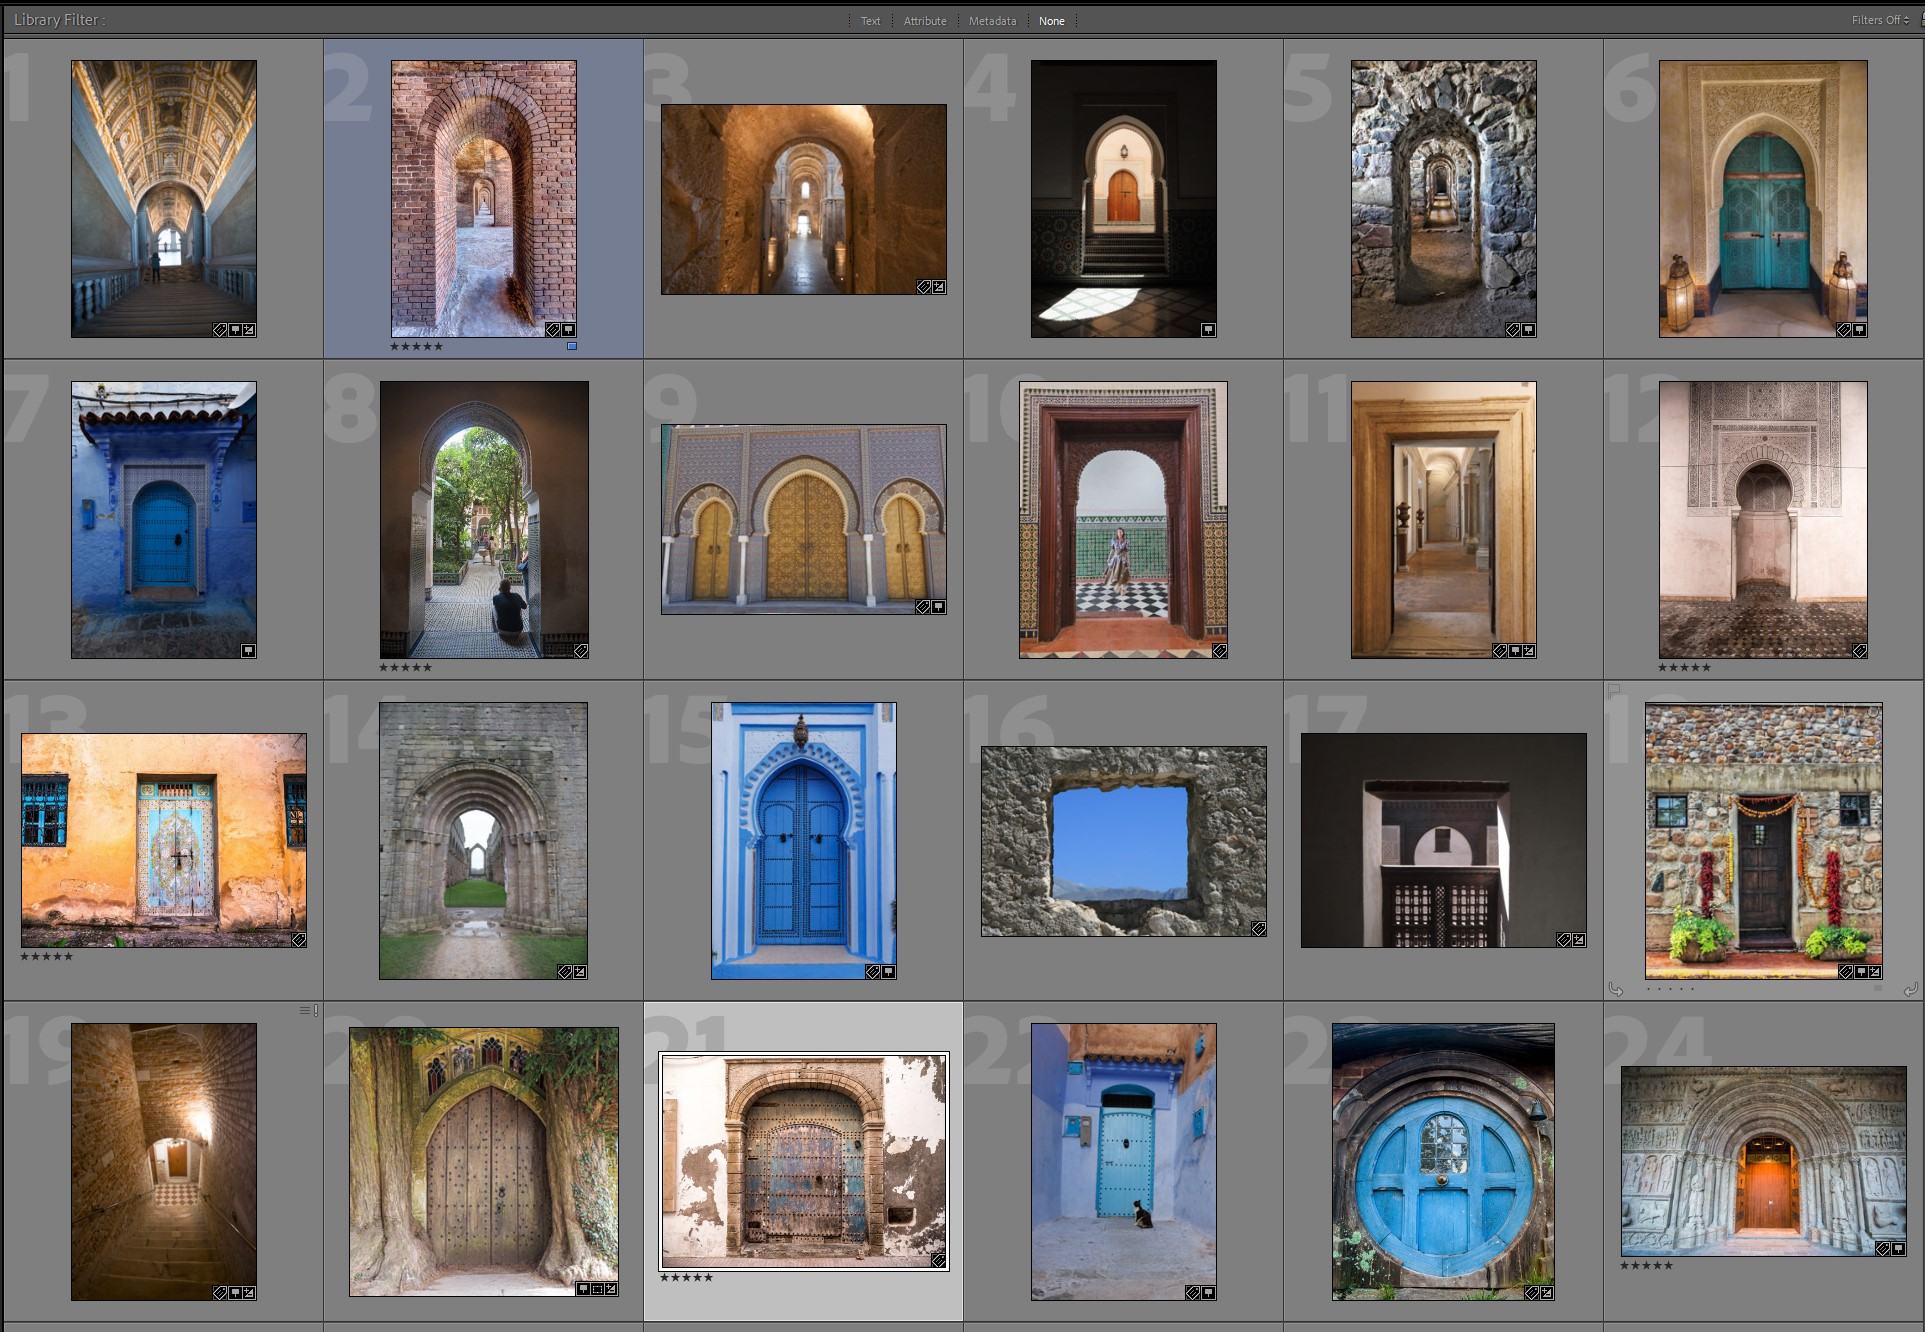
This was actually a lot of fun as a process, as it reminded me of some photos I’d entirely forgotten about taking of doorways around the world.
Overall, I think the Excire products can be very useful, especially if you have a large image library with diverse subject matter as I do. They make searching for images a lot easier.
Naturally, there is a downside, which is cost. The Excire products are definitely fairly expensive compared to the alternatives (although we do have a discount code, see below for more information on that). You could pick up the whole On1 Photo RAW product for less than the cost of Excire’s products, and you’d get a whole editing suite to boot.
That said, if you have a large image library that you have struggled to tame, I think Excire is a seriously useful bit of software. It’s now my go-to for finding images in my Lightroom library, and one I am happy to recommend. I also like that it’s available for a one-off price, with no subscription model required. So, once I’ve bought it, I can keep using it for life.
There is also a 14-day trial available, so you can test it out and see if it works for you. Versions are available for both MacOS and Windows.
You can download the trial for either Excire product on their official website here.
Readers can also save on Excire products with our exclusive discount code: “TRAVELCATS”. Just enter the code at checkout to take advantage of the 15% saving.
Summary of Photo Organization Options
Organizing your photos is definitely important, but it can also be time consuming. Hopefully in this guide I have shown you some of the options available to you to help you improve your photo organization, and make retrieving your images easier.
In summary, my preferred order of tools would be:
- Excire Search or Excire Foto – the most expensive but by far the most comprehensive and useful tool I’ve found to date for searching my images. Use Excire Search if you have Lightroom, and Excire Foto if you want a standalone product to search your images. Save 15% on Excire products with our discount code “TRAVELCATS”, just enter the code at checkout to take advantage of the saving.
- On1 Keyword AI – a cost effective and easy to use option for quickly keywording an image library with minimal effort
- Manual keywording – if all else fails, manual keywording using your existing photo management tool is definitely an option, but it can be hugely time consuming if you take a lot of photos. But if you don’t take a lot of photos or don’t mind using the time to manually add keywords, to each photo, this can be a simple option.
Further Reading
That’s it for my guide to organizing your photos! If you found this useful, you might enjoy some of my other photography related content. Here are some articles to get you started.
- I have a guide to how to make money from your photography as well as a guide to how to sell your photos
- I have a guide to how to display your photos
- I have a guide to my favorite photo editing applications, as well as the best alternatives to Lightroom
- I have a guide to the best noise reduction software for some ideas on how to get the best out of your photos even when they might be a bit noisy
- We have a guide to how to use a compact camera, how to use a DSLR camera, and how to use a mirrorless camera. We also have a guide to how a DSLR works
- Knowing how to compose a great photo is a key photography skill. See our guide to composition in photography for lots of tips on this subject
- We have a guide to what depth of field is and when you would want to use it.
- We are big fans of getting the most out of your digital photo files, and do to that you will need to shoot in RAW. See our guide to RAW in photography to understand what RAW is, and why you should switch to RAW as soon as you can if your camera supports it.
- You’re going to need something to run your photo editing software on. See our guide to the best laptops for photo editing for some tips on what to look for.
- If you’re looking for more advice on specific tips for different scenarios, we also have you covered. See our guide to Northern Lights photography, long exposure photography, fireworks photography, tips for taking photos of stars, and cold weather photography.
- Color accuracy is important for photography – see our guide to monitor calibration to ensure your screen is set up correctly.
- If you’re looking for a great gift for a photography loving friend or family member (or yourself!), take a look at our photography gift guide,
- If you’re in the market for a new camera, we have a detailed guide to the best travel cameras, as well as specific guides for the best cameras for hiking and backpacking, the best compact camera, best bridge camera, best mirrorless camera and best DSLR camera. We also have a guide to the best camera lenses.
- If you want a camera or lens, but the prices are a bit high, see our guide to where to buy used cameras and camera gear for some budget savings options.
- We have a guide to why you need a tripod, a guide to choosing a travel tripod, a round-up of our favourite travel tripods and a review of the Peak Design Travel tripod.
Looking to Improve Your Photography?
If you found this post helpful, and you want to improve your photography overall, you might want to check out my online travel photography course.
Since launching the course in 2016, I’ve already helped over 2,000 students learn how to take better photos. The course covers pretty much everything you need to know, from the basics of how a camera works, through to composition, light, and photo editing.
It also covers more advanced topics, including astrophotography, long exposure photography, flash photography, and HDR photography.
You get feedback from me as you progress, access to webinars, interviews and videos, as well as exclusive membership of a Facebook group where you can get feedback on your work and take part in regular challenges.
It’s available for an amazing one-off price for lifetime access, and I think you should check it out. Which you can do by clicking here.
And that’s it! I’d love to hear about your thoughts on organizing your photos and am happy to answer any questions you have. Just pop them in the comments below and I’ll get back to you as soon as I can.