

Back when I was a kid, my parents rented an RV, and we took a road trip to Yellowstone. I remember being in awe of the colorful geysers, the insane amount of wildlife, and the beautiful scenery. I’ve now been back several times in my camper van, and each time has been no less exciting. As a science-nerd, I absolutely love exploring Yellowstone’s geological wonders.
Just next door to Yellowstone is Grand Teton National Park, where the scenery is completely different. You swap the easy boardwalk strolls among geysers for BIG mountains where the hiking opportunities are just endless.
The good news is you don’t have to choose between the two parks. The proximity of Yellowstone and Grand Teton makes it so easy to combine them into an incredible weeklong road trip that offers a bit of everything.
With this 7-day Yellowstone and Teton road trip itinerary, you’ll hit up a large number of the best sites in the parks without spending too much time in the car. In this day-by-day itinerary, I share the best road trip stops, hikes, things to do, places to stay, and even some restaurant suggestions to help you plan an epic visit.
Here’s the ultimate road trip itinerary for a week well-spent in Yellowstone and Grand Teton National Parks!
Itinerary Overview
This 7-day road trip itinerary starts with two days in Grand Teton National Park, where you’ll be hiking, enjoying Jenny Lake, and dipping in town to explore Jackson.
After that, you’ll continue north to Yellowstone National Park. Yellowstone is absolutely massive, being the second largest National Park in the lower 48. This is why I’m devoting three full days for exploring Yellowstone. Here is a day-by-day overview of what you will see and do on your road trip.
Closest Airports to Yellowstone & Grand Teton National Parks
There are a couple of starting points options for your Yellowstone and Grand Teton itinerary, depending on where you fly into. I’ll start with the major airports first since these are going to be the cheapest to fly into to and will also have the cheapest car rentals. If you want to do this road trip in a camper van, these two cities also have a number of camper van rental companies to choose from.
Salt Lake City, Utah
Salt Lake City is the closest major airport, about 5 hours from the southern end of Grand Teton National Park and the town of Jackson where the good stuff begins.
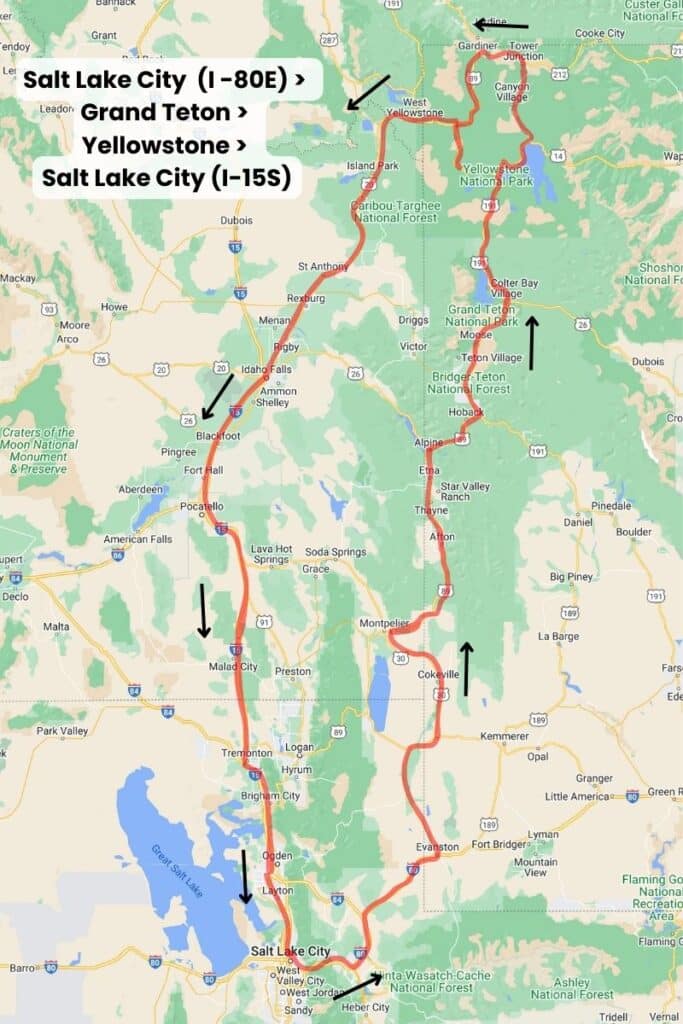
There are two different routes from SLC to Grand Teton National Park. The route pictured below is my suggested route. It provides the best scenery on the way up, and the quickest drive back to Salt Lake.
Following my suggestion, you’ll take I-80 East out of Salt Lake and then turn North at Evanston on US-89. Once you hit Alpine you’ll be driving next to the Snake River almost all the way to Jackson. This route is slightly longer than the alternate route driving through Lava Hot Springs and Soda Springs (not pictured) , but it’s much prettier in my opinion. You also avoid the long boring stretch of I-15 that you will also be driving on your way back to Salt Lake after leaving West Yellowstone.
Alternate return option: If you don’t mind a longer drive on the way back to Salt Lake, you can make a full circle in Yellowstone and backtrack down through Grand Teton and Jackson. From there, you can take the same exact route back to Salt Lake, or you can drive over Teton Pass and through Victor before hopping on I-15.
Boise, Idaho
Boise is 5.5 hours from Jackson, which is about a hour longer drive than if you start in Salt Lake. I’d compare the cost of flights and car rentals to Salt Lake, and if Boise is a lot cheaper, than I’d consider flying in and out of there. Boise is also a really cool town worth exploring if you can tack on an extra day or two.
Apart from being shorter, I personally prefer the drive from Salt Lake. I think it’s prettier and the drive requires less time on big highways. However, on your route back to Boise, you do drive right by Craters of the Moon which is an interesting stop if you aren’t in a rush.

Bozeman, Montana
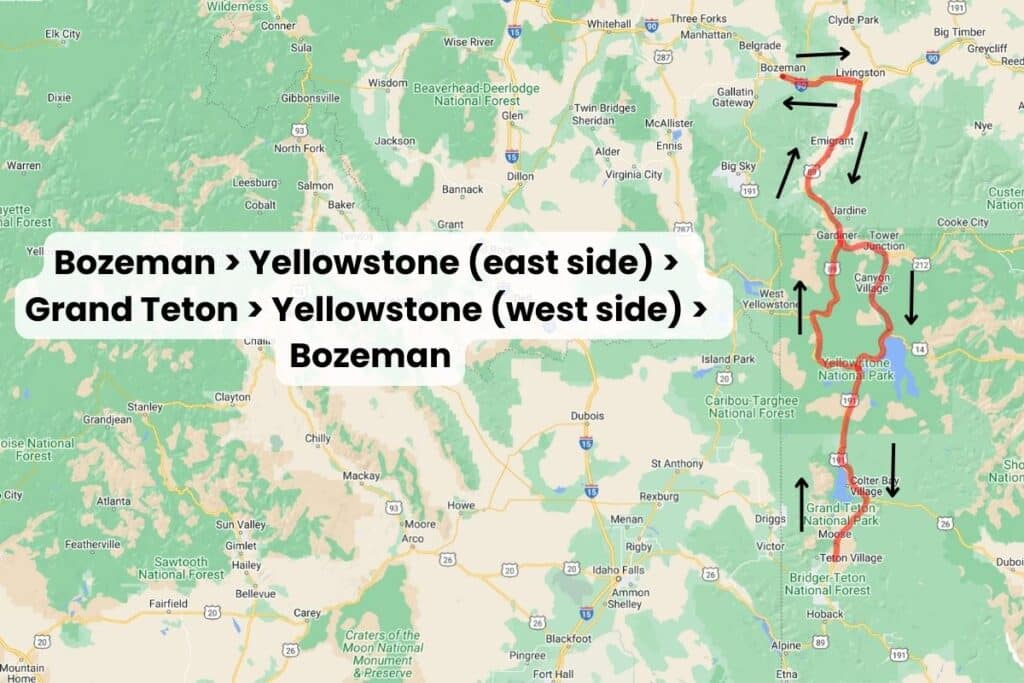
Bozeman is actually the closest major airport to Yellowstone. It’s only 1 hour and 40 minutes from the north entrance. However, flights into Bozeman are typically a lot more expensive than Boise or Salt Lake City. Again, it’s definitely worth pricing out your options because starting in Bozeman will allow you to spend more time in Yellowstone and Grand Teton since you’ll cut out a lot of the driving time to get there.
If you start in Bozeman, you can still do all of the stops I mention in the itinerary below, but you’ll do them in a different order. Instead of starting in Grand Teton like I did, you’ll be coming from the north, starting in Yellowstone. You can do one half of Yellowstone on the way down and hit the other side on the way back up.
Jackson, Wyoming
It’s worth checking prices in Jackson since it is the most convenient airport to fly into for this Yellowstone and Grand Teton itinerary. The Jackson Airport is actually inside Grand Teton National Park which is pretty cool. If you choose this option, be prepared to pay a premium. Flights and car rentals in Jackson are $$$$!

Things to Do Before you Go
Here are a few special tips for things you’ll want to do before you hit the road for Yellowstone and Grand Teton.
Note: This blog contains affiliate links and references to my sponsors. As always all words and opinions are my own.
Your own personal tour guide
Shaka Audio Tours
I first discovered Shaka Audio Tours when I was driving the road to Hana in Maui and loved being able to learn more about the area. Now when I’m planning a road trip, I always check to see if there is a Shaka tour for my destination.
Shaka has over 50+ audio tours for National Parks, state parks, and other scenic drives, including Yellowstone/Grand Teton, the Grand Canyon, Sedona, Lake Tahoe and more.
Detailed Yellowstone Grand Teton Itinerary
Day 1: Arrive Jackson, Explore Town
Morning – Arrive, Eat Lunch
In the morning on Day 1, get an early start and travel to Jackson, Wyoming. Once you arrive, grab some lunch and poke around town. It’s a tourist town but has a unique tempo to it and lots of individual mom-and-pop stores. Some yummy spots in town are Figs (Lebanese), Hand-Fired Pizza, and Healthy Being Cafe and Juicery. Also, Persephone Bakery (not vegan-friendly) is insanely popular.
Afternoon – Set up Camp
If you’re staying at a hotel, it’s best to stay somewhere right in Jackson or north of town rather than out near Jackson Hole (the ski area). Staying in town or even north of town will put you closer to the things you are going to do in Grand Teton National Park. Note that hotels in Jackson (like the flights) are expensive, and you should be prepared to spend at least $200 a night for a 3-star hotel.
Personally, if you enjoy car camping, I think that’s the way to go (if you’re new to car camping, check out my Car Camping 101 Guide). While the Grand Teton National Park campgrounds are some of the most expensive I’ve ever seen (more than $55+/night), you’ll still save a ton of money, and the locations of the campgrounds are a lot more convenient for exploring the National Park. In addition, there aren’t many restaurants along this itinerary, so having your camp cooking gear will allow you to prepare your meals as you go. Here are the Grand Teton campgrounds that work best for this itinerary.

Even though it may result in a bit more driving, I’d stay at the same campground for all three nights that you’re in Grand Teton so you don’t have to set up and take down your camping gear more than once. However if you want to move sites to minimize driving, you should stay at Gros Ventre or Jenny Lake on night 1 and Jenny Lake or Signal Mountain on night 2 and 3.
Before you drive to the campsite, stop at the Grand Teton Visitor Center near the South Entrance. It’s a great place to grab a map, and I also purchased bear spray there, which you will 1000% want for this trip. You should have your bear spray easily accessible on all hikes and at your campsites.
Day 2: Hike Death Canyon
Morning – Go Hiking
Today you’re going to hike from the Death Canyon Trailhead which is located off Moose Wilson Road by the South Entrance. There are a few different options depending on what kind of challenge you are looking for. If you choose a longer hike, you should pack a lunch since there aren’t any nearby dining options.
Bears frequent this area. You’ll want have your bear spray handy and brush up on your bear safety so you know what to do if you encounter one.

Afternoon – Relax
Post-hike head back to camp or your hotel and relax. Tomorrow you’ll be doing one of the most epic hikes in the Park, so you’ll want to rest up.
If you’re staying at Gros Ventre or a hotel in town, you can grab a bite to eat in Jackson. The Kitchen is my favorite place for dinner.
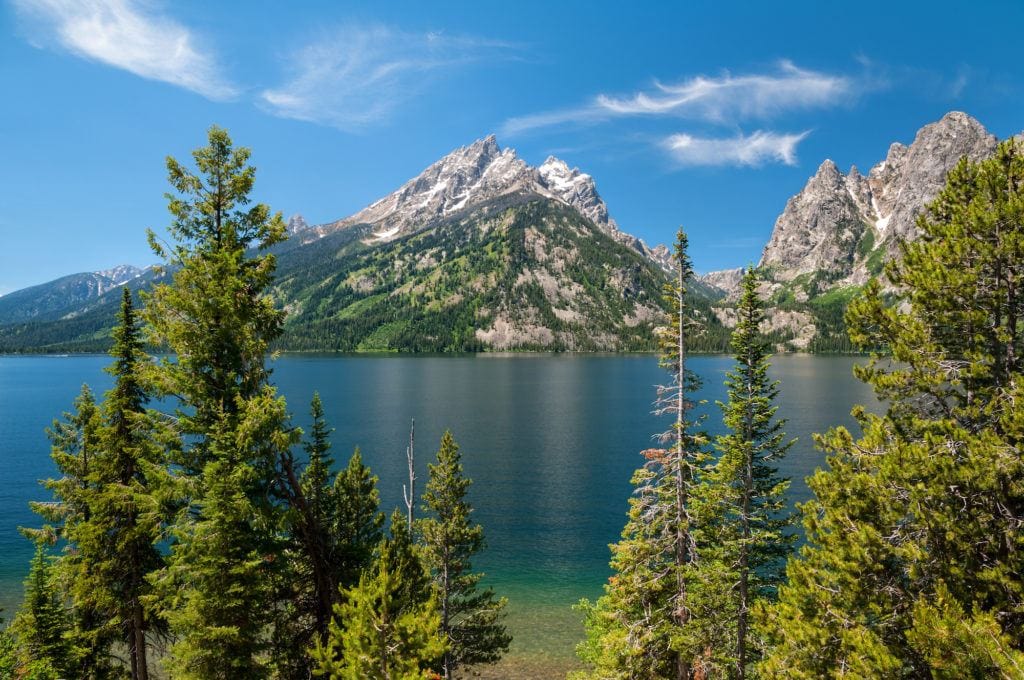
If you’re camping further from town, set up your camp chair, read a book, cook dinner, or wander around to check out your surroundings. You can also cruise up to Jenny Lake. You’ll be back there tomorrow, but you really can’t get tired of these views.
Day 3: Hike to Inspiration Point and Cascade Canyon and Stop at Signal Mountain Lodge
Morning – Hike Cascade Canyon
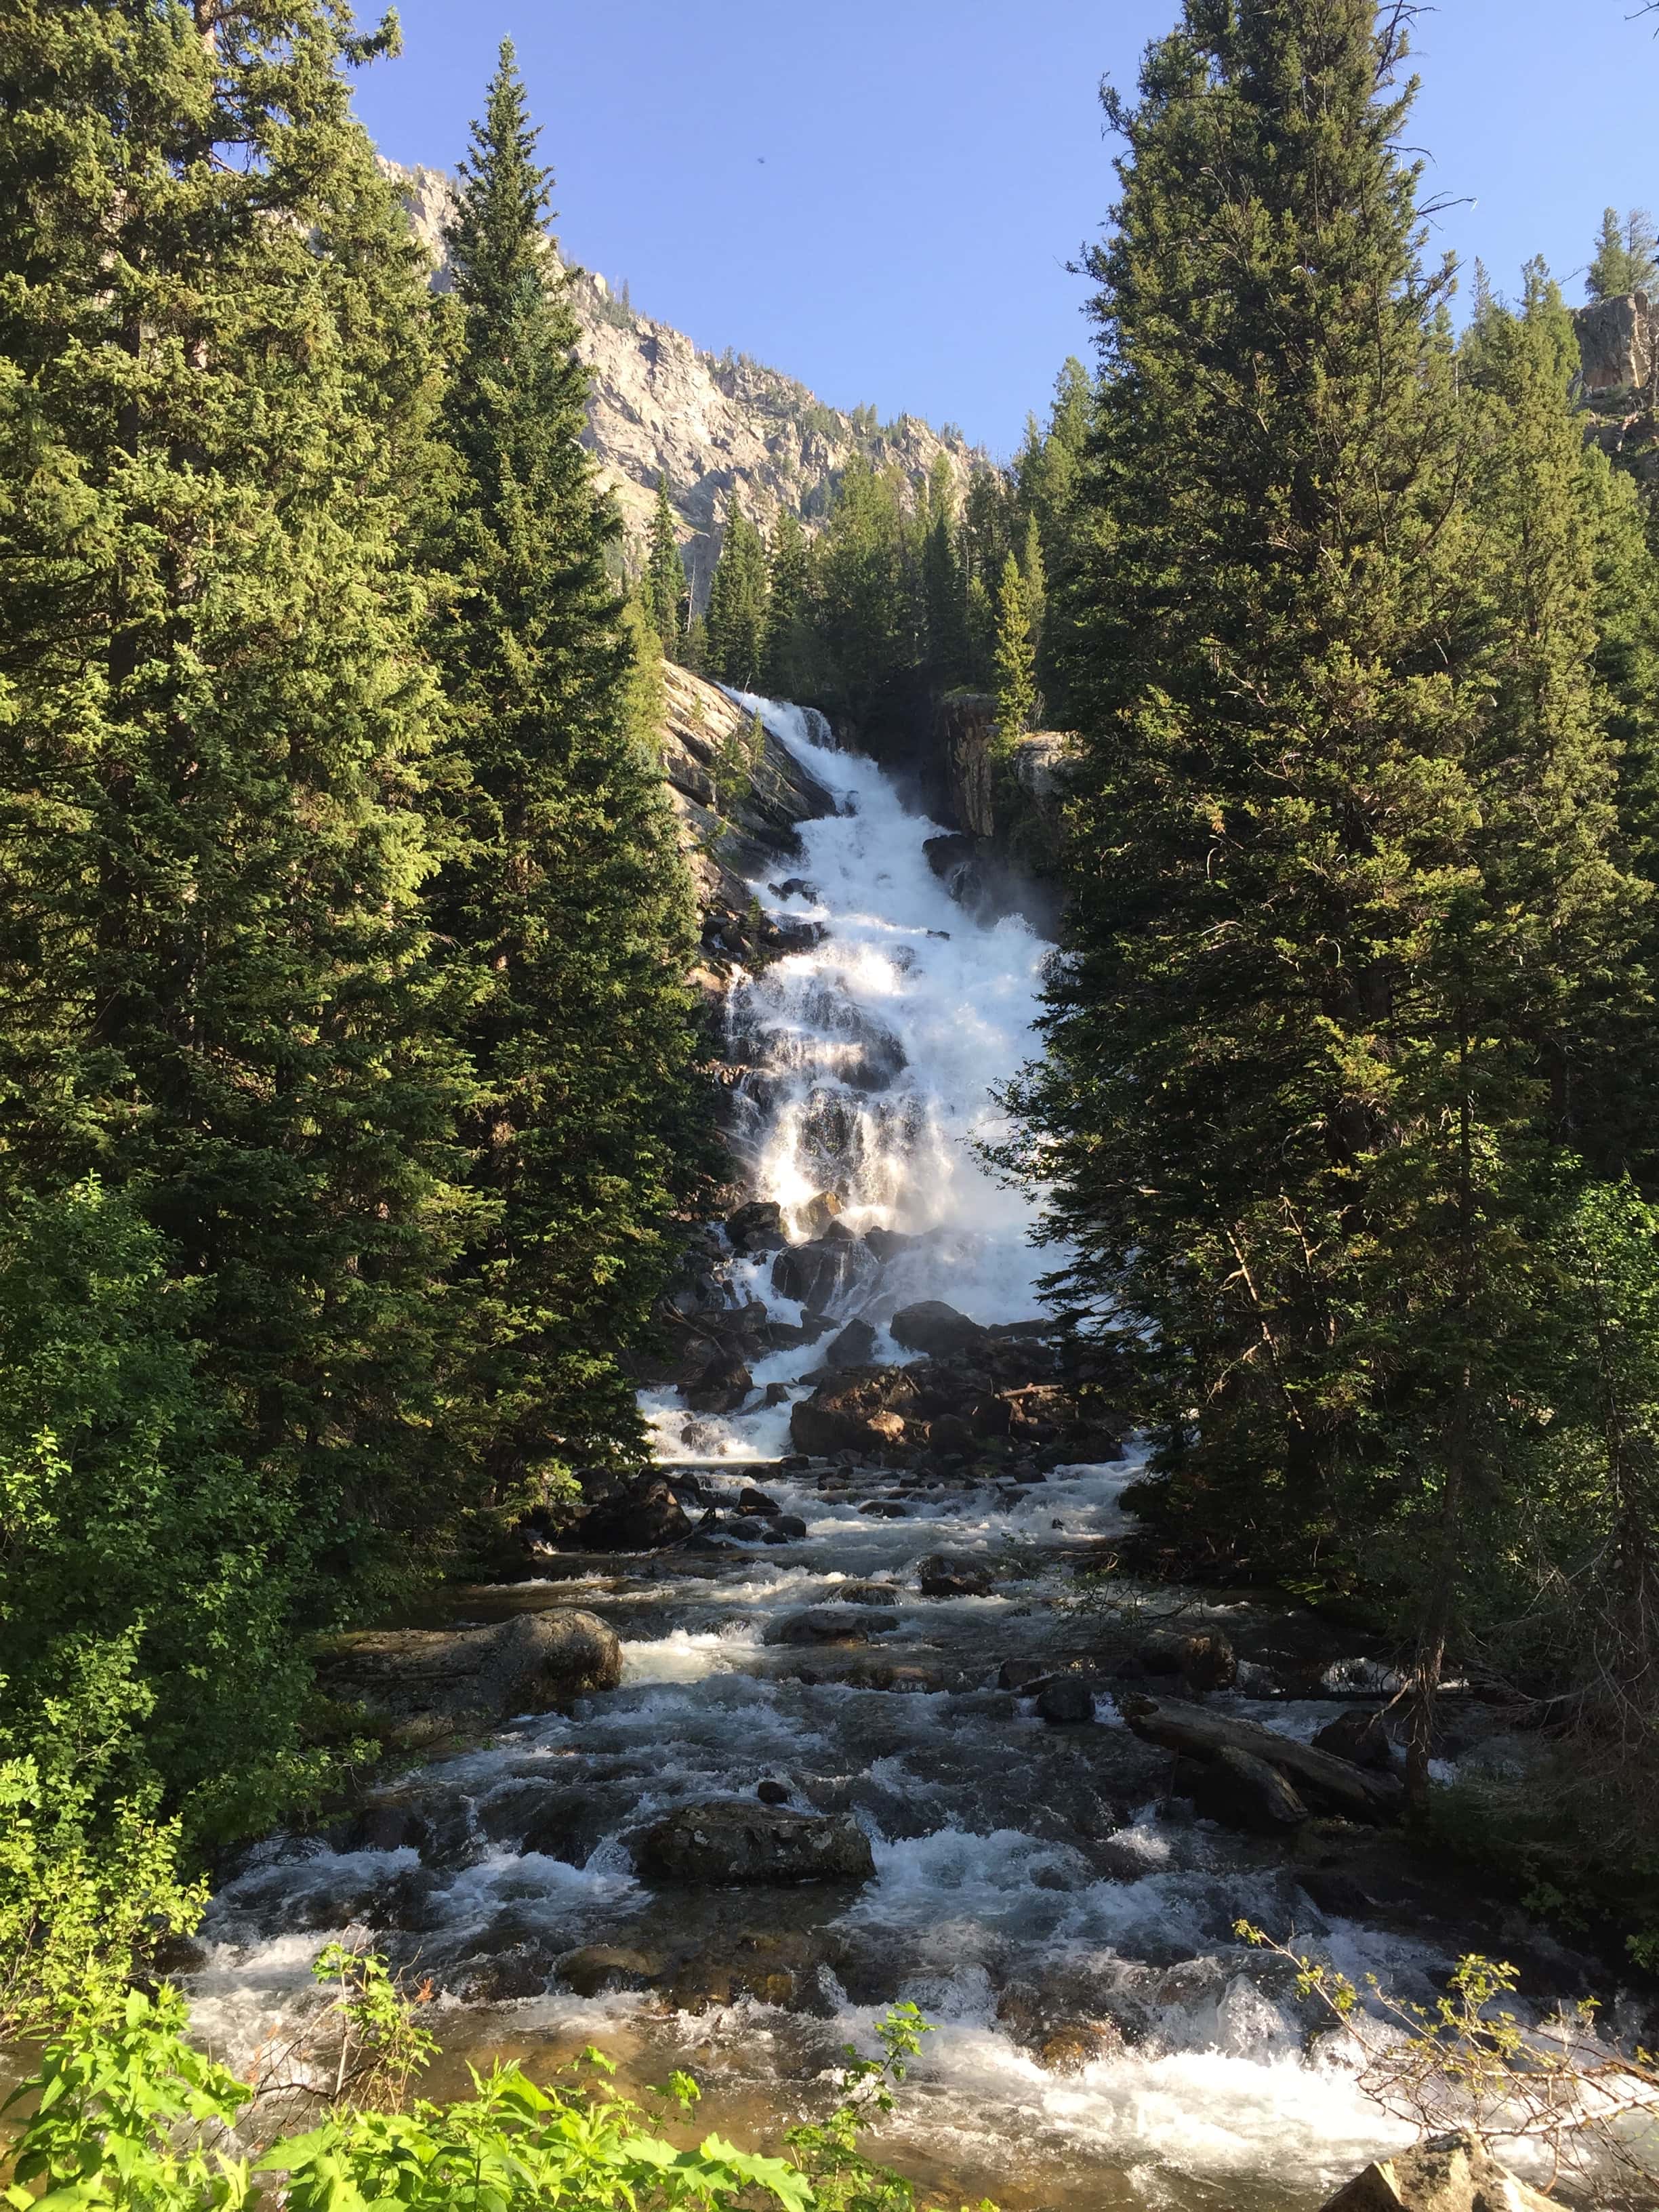
On Day 3 of your road trip, you are going to hike up Cascade Canyon. This is one of the most stunning (and popular) trails in the Grand Teton National Park. You’ll want to wak up early and drive to Jenny Lake. Then in order to save yourself 2 miles each way, I suggest getting on one of the first boat shuttles across Jenny Lake to the trailheads on the other side of the lake. This will give you a chance to enjoy the trail in peace before all of the crowds show up. Shuttles run non-stop throughout the day, and you don’t need a reservation.
Once you’re on the other side, the trail to Hidden Falls, Inspiration Point, and Cascade Canyon leave right from the boat dock. Like yesterday, you have multiple options depending on how far you want to hike.
One more thing to keep in mind is that moose and bears frequent this area, so you might get to see one (or more). If you encounter wildlife, give them space. Don’t get all up in their business trying to take photos.
Afternoon – Post-hike treats at Signal Mountain Lodge
When you return from your hike, head up to Signal Mountain Lodge for a post-hike treat. While I don’t drink anymore, and I’m plant-based, I hear the huckleberry margaritas (for passengers) and nachos are a local favorite among the park staff. Afterwards, drive up the Signal Mountain Road for an impressive aerial view.
After that, head back to your campsite. Try to get all of your gear organized because tomorrow you’re packing up and heading up to Yellowstone for the next leg of this itinerary.
Day 4: Arrive in Yellowstone, West Thumb Geyser Basin, Grand Canyon of the Yellowstone
Morning – Drive to Yellowstone, West Thumb Geyser Basin
It’s Yellowstone or bust! The Grand Teton portion of this itinerary is wrapping up as you pack up your car and road trip up to Yellowstone. Be prepared to see a whole new world in a very short distance on your Yellowstone trip. Ryan referred to Yellowstone as “extraterrestrial” or “something from another planet.” And, it’s true, it really has that feel.
Depending on where you camped it could take you anywhere from 30 minutes to 1.5 hours to reach the Yellowstone south entrance. The drive is beautiful, hugging Jackson Lake with views of Mt. Moran. I made Ryan stop several times for photos. You also cross the Continental Divide.

On your way into the park, swing by the Grant Village Visitors Center to see the video about the famous 1988 Yellowstone fire that burned a third of Yellowstone— it helps you grasp the level of devastation Yellowstone faced, and why some areas look the way they do.
About 20 minutes after entering Yellowstone National Park and just a few minutes up from the Visitor’s Center, your first stop is going to be the West Thumb Geyser Basin. Personally, this is one of my favorite geyser basins in the Park due to the fact that it sits on the edge of Yellowstone Lake. That backdrop is something you won’t see anywhere else in Yellowstone. It’s also less crowded than some of the other geyser basins. It takes about 45 minutes to walk around here.

From West Thumb, you are going to head northeast, driving the big loop around Yellowstone in a counter-clockwise direction. Your next major stop is the Grand Canyon of the Yellowstone. On the way, you can stop at Gull Point for another perspective of Yellowstone Lake, as well as Sulphur Cauldron and Mud Volcano. These are the park’s most acidic hot springs and are worth a quick stop along the way.
Finally, you’re probably going to want to stop and eat some lunch before the afternoon’s activities. There are several pretty places to pull off along the Yellowstone River.
Afternoon – Grand Canyon of the Yellowstone
The Grand Canyon of The Yellowstone is carved by the Yellowstone River and is where you’ll find Yellowstone’s Upper and Lower Falls. At 308 feet tall, I found the Lower Falls to be more impressive, but you should have time to check out both.
First you should drive down the South Rim. You can check out the Upper Falls Viewpoints before going to Artist Point. This is the furthest viewpoint of the Lower Falls, but being zoomed out lets you see the entire canyon and the river flowing through it below.

Next get back in your car, drive to the North Rim and park. Take the Rim Trail out to Lookout point where you can get a closer view of the Lower Falls and really see it’s magnitude.
Your last viewpoint I checked out was the Brink of the Lower Falls. This is a short steep set of switchbacks that drops 600 feet over 3/8 of a mile that is a bit of a doozy on the way back up. I brought my trekking poles to make the hike up a bit easier. The end point of this trail puts you right at the top of the Lower Falls where you can experience how powerful the falls really are. It’s misty and wet, and you can see right over the edge where the Falls go tumbling down. I thought it was worth the effort, but if you don’t like steep climbs, you should skip this.
Evening – Camp at Canyon Village
Your first campground for the Yellowstone portion of this road trip itinerary is Canyon Campground. Just like all of the campsites, you have to make reservations far in advance. If they don’t have any availability, you could also stay at Tower Fall (closed in 2024) or Slough Creek (a quieter experience). You should plan to stay at whatever campsite you get for 1 night since you’ll be moving again tomorrow.
Day 5: Lamar Valley, Mammoth Hot Springs, Optional Hike to Osprey Falls
Morning – Lamar Valley
Early bird catches the worm when it comes to seeing wildlife in Lamar Valley and also avoiding the traffic that builds up on the road. While this means you’ll have to pack up your campsite early (like 5am or 6am early), I promise you’ll have a way better experience than if you roll in Lamar Valley at 10.
I once visited Lamar Valley in the afternoon, and traffic was crazy. Of course part of this that the bison walk in the road, and everyone has to stop their vehicles to avoid them, but you have a lot more ability to maneuver before there are cars everywhere.


Lamar Valley is THE place to see wildlife in Yellowstone. We literally saw hundreds (maybe thousands) of bison. We also saw elk and pronghorn. If you’re really lucky, you may also see bears and even wolves. We heard the best chance of seeing wolves was along Slough Creek, so we cruised up there, but didn’t have any luck.


After you’re done hanging with the animals, you’ll make the twisty drive over to Mammoth Hot Springs. There is food available there, as well as some picnic tables if you’re ready for lunch.
Afternoon – Hike to Osprey Falls
If you feel like you need to stretch your legs after spending all morning in the car, I really enjoyed the hike to Osprey Falls. It’s one of the lesser known trails in Yellowstone, located near Mammoth Hot Springs. I think we saw less than 6 people the entire hike.
It’s 7.3 miles roundtrip with 1,243 feet of elevation gain, making it a moderate to challenging hike. The first part travels through a flat grassy area. I will say I was a bit nervous here, as I read grizzly bears are common in this area. I had my bear spray on my hip ready to deploy if needed.
After 1.5 miles, the trail starts to gradually climb, gaining about 1,000 feet over 2 miles until you reach the base of the falls. At one section you hug the rim of a canyon, resulting in some pretty vast views. Plus, the waterfall was actually quite impressive, and we had it all to ourselves.
If you aren’t into big hikes or you are short on time, this is something you could skip.


Evening – Mammoth Hot Springs and Camp
After you wrap up your hike, the last adventure of the day is exploring Mammoth Hot Springs, one of the more unique geysers in Yellowstone. The water that pours over the hot springs has been in the ground for over 1,000 years and is responsible for all of the formations in the area as it cascades down. We went right before the sun went down and found the lighting to be very nice, and all of the people were gone for the day. It only takes about 30-45 minutes walk around here.

The most convenient place to camp tonight is going to be the Mammoth Campground or Indian Creek, which is where we stayed. If you are really feeling like you could use a shower and a bed, you could also book a room at the Mammoth Hot Springs Hotel or head into West Yellowstone where there are lots of inexpensive motels.
Day 6: Old Faithful and Geysers Galore!
Morning – Norris Basin, Lower Geyser Basin and Grand Prismatic Spring
By the end of today, I promise you are going to be totally geyser’ed out. There is of course more that you can see, but I’m going suggest what I consider to be the coolest geysers in Yellowstone. Most of these require a little bit of walking on a boardwalk, but none of it is too intense. Be patient when parking. These spots are popular and the parking lots can be a bit hectic.
First stop is Norris Basin, home to the hottest, oldest geysers in Yellowstone. There were some really pretty milky blue and emerald colored pools here. We spent about 1.5 hours walking around the two loops.

Next you’ll stop at the Lower Geyser Basin. My favorite hot spring here was Silex Spring. The color was an unbelievable shade of turquoise, and it was less than 100 yards from the parking lot.

Your final stop before lunch is Grand Prismatic Spring, one of the most beautiful geysers in the Park. For an even better view, take the Grand Prismatic Overlook Trail up 200 feet where you can peer down and really see the contrast in the colors. Parking for the Overlook Trail is a couple minutes drive away at the Fairy Falls parking lot.

Afternoon – Upper Geyser Basin and Old Faithful
The last major stop on your road trip is the Famous Old Faithful. The first thing you should do when you arrive is check the schedule. The geyser erupts about every 65-90 minutes. There are signs everywhere in the area informing you of the next eruption. The viewing area is big, but it does get super crowded. So, I suggest arriving at least 15 minutes before the eruption to secure a good viewing spot and earlier if you want to sit down.

If you have some time to kill, you can grab some food from the cafeteria, the bakeshop, or the dining area. There is also a picnic area near the East lot if you packed your own lunch.
Once you’ve seen Old Faithful erupt, follow the boardwalk around to explore the Upper Geyser Basin, which has the largest concentration of colorful hot pools in the world.


As the sun sets, for the final night of your Yellowstone Grand Teton road trip, head on over to the small town of West Yellowstone for a night at a local motel. There are plenty of restaurants to choose from as well.
Day 7: Drive back to your starting point
Today your goal is to drive back to your starting point. I recommend booking a late flight so you don’t have to get up at the crack of dawn and have plenty of time to drive to the airport without feeling stressed.
If you have a couple extra days for your Grand Teton Yellowstone itinerary, here are some additional things to do:


Short on Time?
If you don’t have a full week for your Yellowstone Grand Teton itinerary, here is what I would cut out:
Frequently Asked Questions
Early summer through mid-fall is the best time to visit Yellowstone and Grand Teton. Many of the roads close in winter making the sites inaccessible. The road between Grand Teton and Yellowstone also closes and doesn’t usually open until mid-May. September is my favorite month to visit. The Parks are way less crowded, you can usually snag a campsite, and the temperatures are still comfortable for camping.
October is also beautiful with the fall colors, but the evening lows can be pretty chilly for camping, and the Jenny Lake boat shuttle usually stops operating at the end of September. That means if you want to hike Cascade Canyon, you’ll have to walk around Jenny Lake adding 4 miles to your hike.
The most popular time to visit Yellowstone and Grand Teton is July and August. If you visit during these months, be prepared for crowded trails, full parking lots, and lines to get in and out of the Parks.
Unfortunately, Yellowstone and Grand Teton are not dog-friendly. In both Parks you can have your dog on a leash in the campground, but dogs are not allowed on any trails, boardwalks or beaches. Bringing your dog means you’re going to miss out on 98% of the activities in this road trip itinerary.
I created this 7-day Grand Teton and Yellowstone itinerary because I think that’s the amount of time that’s needed to experience the best things to do in both Parks. Doing it in less time than that means you’ll have to skip some of the major highlights.
If you have fewer than 4-5 days total for your road trip including your drive to and from the Parks, I’d suggest choosing one Park to visit, rather than doing both. With that little time, you’d barely be scratching the surface trying to cram both Parks in. Pick one and come back another time for the other. If you have more than 7 days, you’ll still have plenty to do, allowing you to hike and explore some of the lesser known regions of the Parks.
Yellowstone is a much bigger park than Grand Teton, and driving through the Park takes significantly more time. My suggested week-long itinerary that combines the two Parks has you spending two full days in Grand Teton and three full days in Yellowstone.
No, you do not need reservations to enter Yellowstone and Grand Teton. There is also no timed entry system so you can enter and leave the Parks as you please. You do however need a reservation for the campgrounds or backcountry camping.
Save this post to Pinterest
Are you planning a Yellowstone and Grand Teton National Park road trip or have you been? Share your comments, questions, and experiences below.